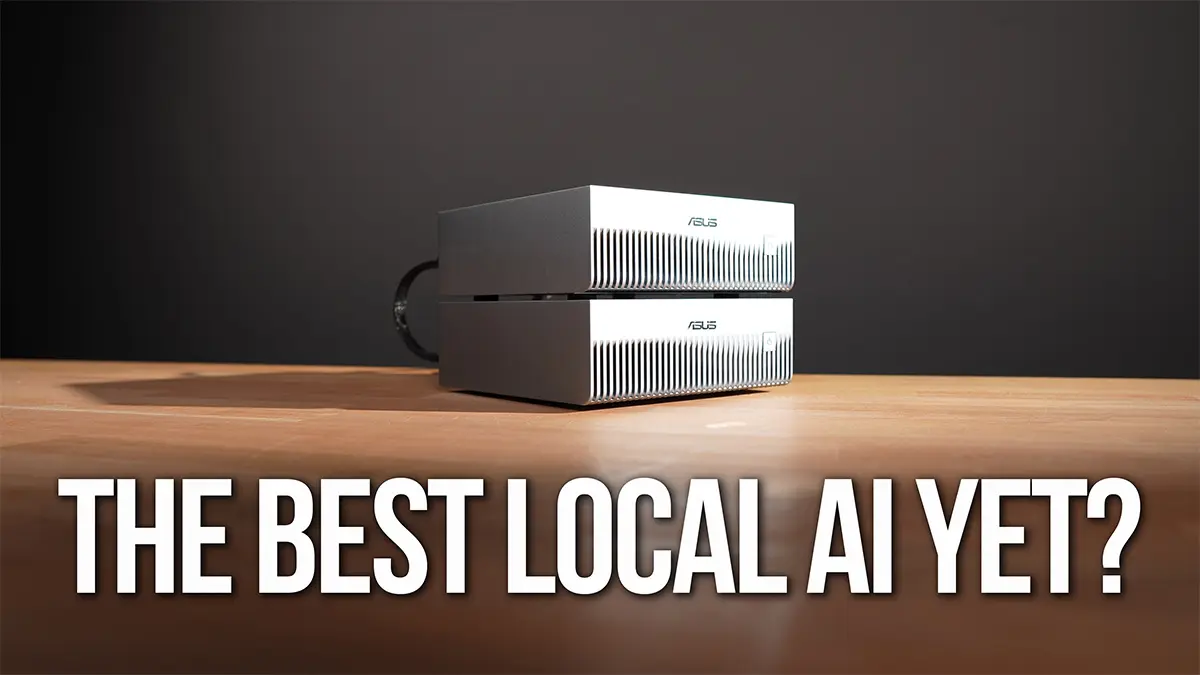
I Built a 256GB Local AI Cluster on My Desk
I have been covering local and self-hosted AI for a few years now - from running models privately at home to what is still running in my homelab today. But to run the larger, more capable models, you need something more specialized than a general-purpose home server.
I wanted to know how good local AI has actually gotten, so I built a mini AI cluster on my desk and used it for a real coding workflow.
Not a chat demo. Not a synthetic benchmark. A real project, a real agent, real model serving, real power draw, and all the weirdness that comes with getting the whole stack working locally.
The hardware was two ASUS Ascent GX10s. One GX10 was the practical test. Two GX10s were the bigger-model test.
If you are setting up a GX10 or DGX Spark from scratch and want the server-first version of this stack, I wrote that up separately in Ubuntu Server on the NVIDIA DGX Spark. The automation and docs live in github.com/timothystewart6/ubuntu-gb10.
The question was simple: can local AI actually do useful coding work now, and does adding a second machine make the workflow meaningfully better?
The short version
One GX10 made local agentic coding feel practical.
Two GX10s made a much larger local model possible.
But neither version made local AI effortless.
That’s probably the most honest summary of the whole test. The hardware has gotten genuinely capable, and the fact that this entire workflow can run locally without any cloud dependency is still kind of remarkable. But once you move past a simple chat interface, local AI becomes a full system problem.
You are dealing with model storage, networking, memory pressure, vLLM, OpenCode, Docker, NCCL, monitoring, power draw, and the actual app the agent is trying to build.
When it works, it feels like a glimpse of where local AI is headed. When it breaks, it’s not always obvious which layer caused the problem.
 Two small boxes, 256GB of unified memory across the pair, and a lot of moving parts.
Why I tested more than just the model
A lot of local AI testing starts and ends with whether a model can run.
That’s useful, but it’s not the whole story.
For me, the interesting question is whether local AI can actually become part of a workflow. Can I point an agent at a project, have it understand the files, make changes, run commands, hit errors, fix them, and leave me with something useful to review?
That requires more than a model. It requires the whole stack to work together:
- storage for large model files
- networking fast enough to make shared storage practical
- enough memory to load the model and KV cache
- a serving layer for the model
- an agent that can use the model
- monitoring so I know what the hardware is doing
- an actual app to build and test
That’s what made this project worth testing. The GX10 was not just a box to run a model. It became part of a local AI development environment.
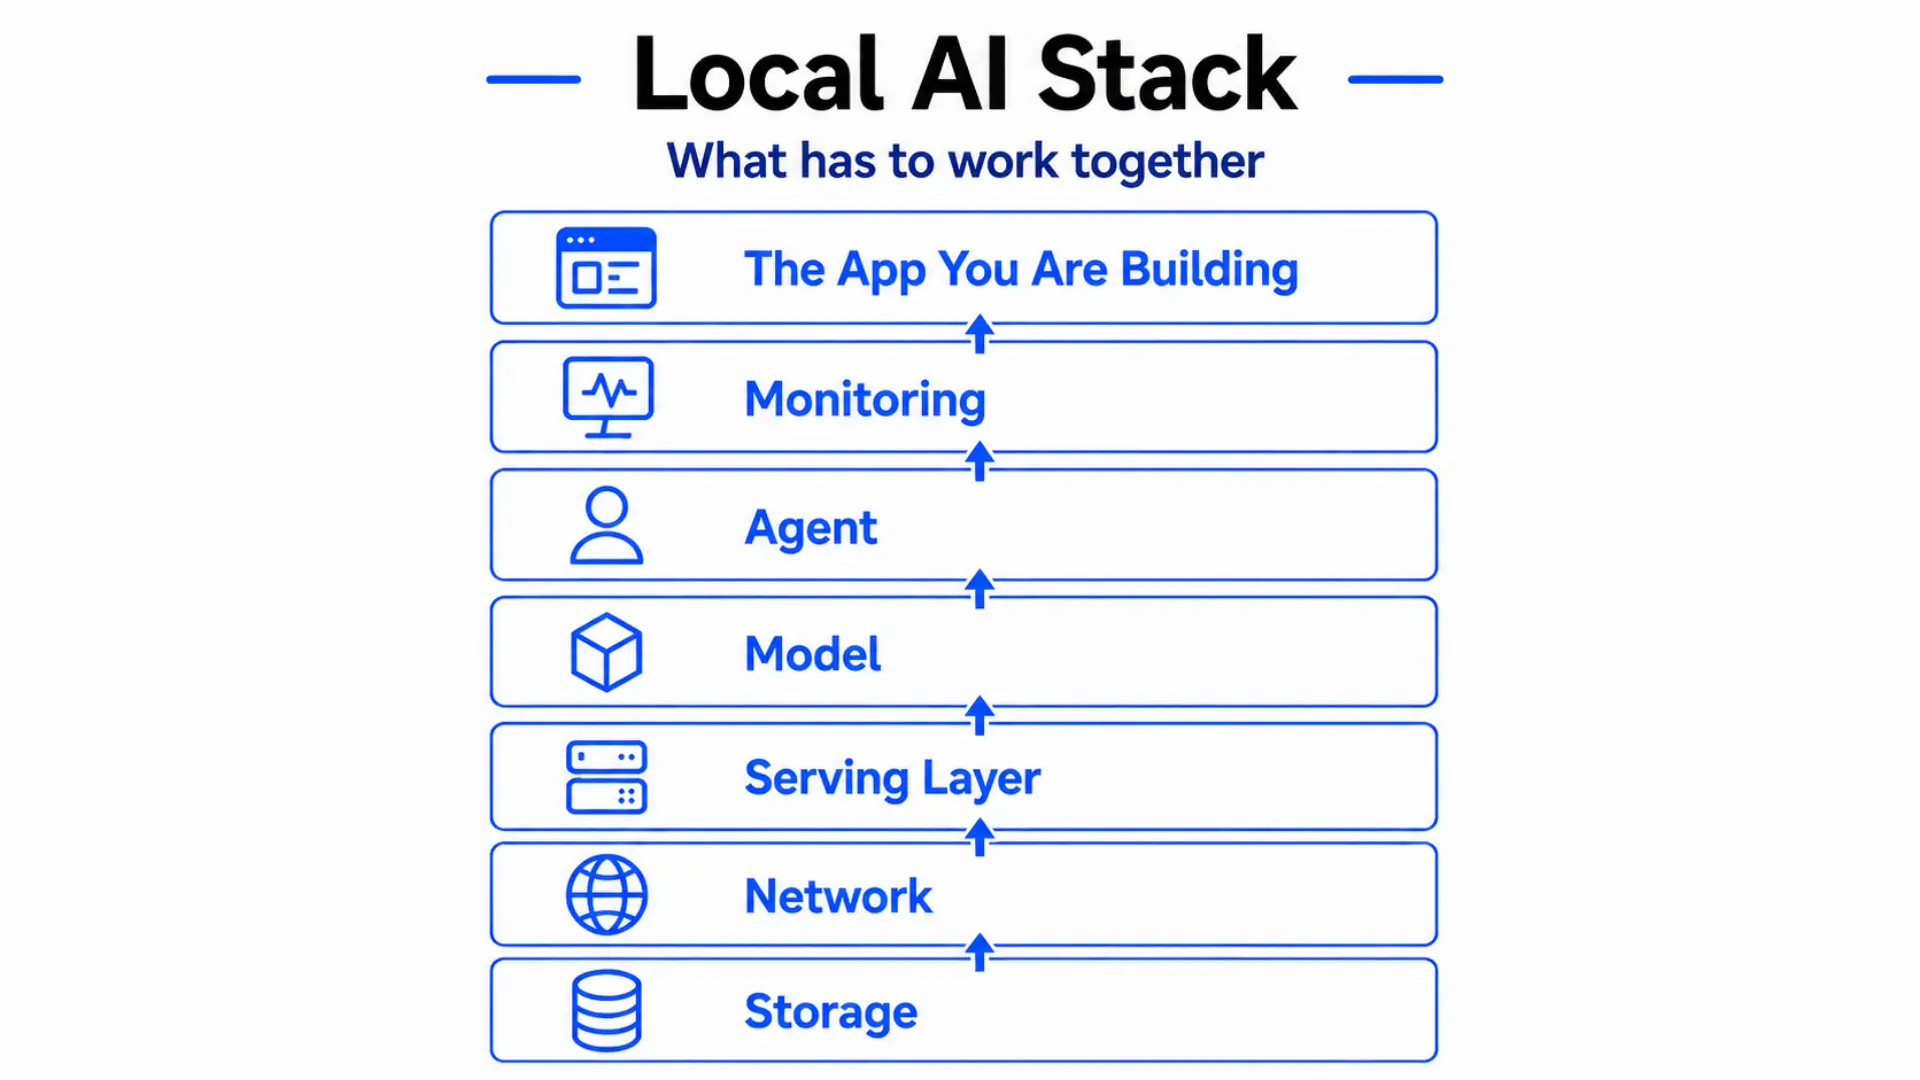 The full local AI stack - every layer that has to work together, from storage at the bottom to the app you are building at the top.
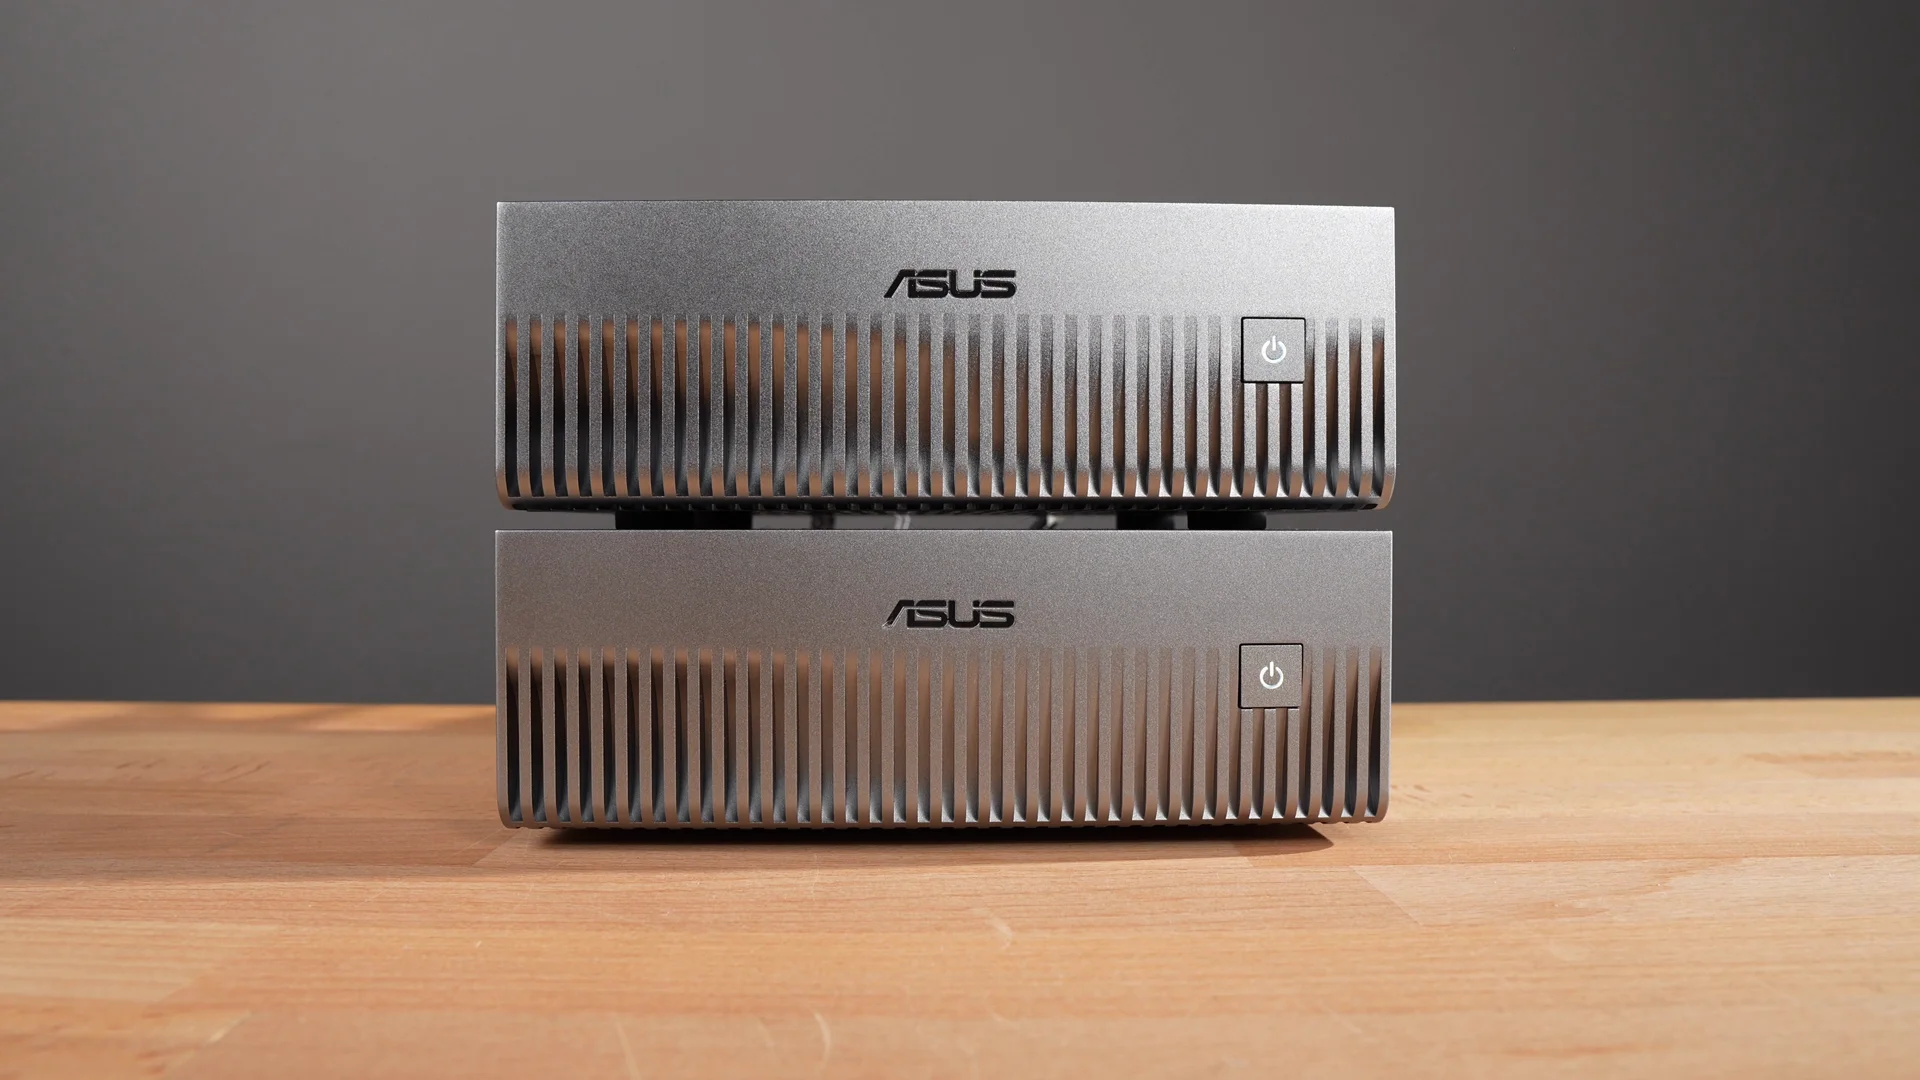
The hardware: small box, large memory
The ASUS Ascent GX10 is a small desktop AI system built around NVIDIA’s GB10 Grace Blackwell platform. Each machine has an ARM CPU, a Blackwell GPU, and 128GB of unified memory. MSRP is $3,499.
That memory is the part that matters most for this kind of testing.
With local models, the question is often less “can this computer run AI?” and more “can the model I want actually fit into memory with enough room left for everything else?”
One GX10 gives you 128GB to work with. Two GX10s give you 256GB across the cluster, but that does not magically become one giant memory pool for every workload. The software still has to know how to use both machines.
That’s where the cluster side becomes important.
 The ASUS Ascent GX10 - compact enough to sit on a desk, with 128GB of unified memory inside.
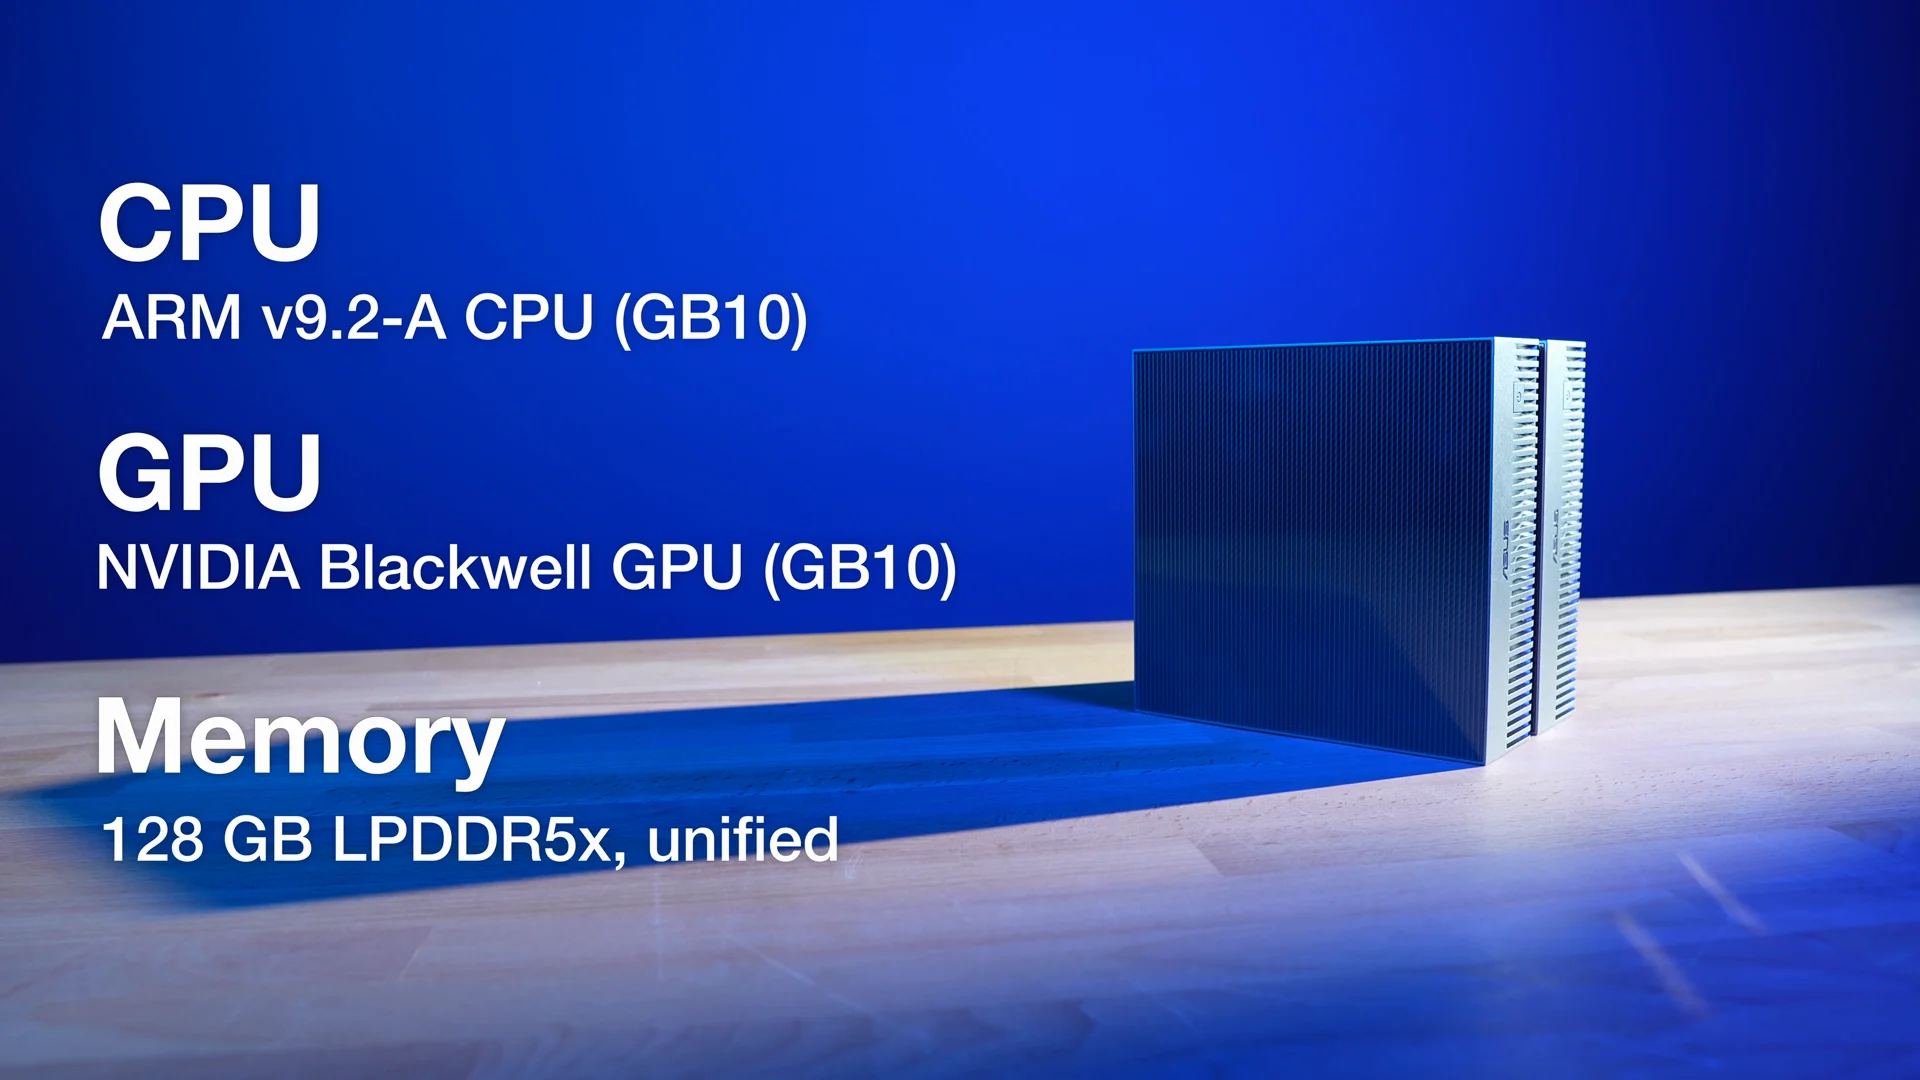 NVIDIA’s GB10 Grace Blackwell platform inside each GX10: ARM CPU, Blackwell GPU, and 128GB of unified memory.
The cluster link
Each GX10 has a standard 10GbE port, which was useful for reaching my NAS. But for the two-node test, the more important connection was the NVIDIA ConnectX-7 and the QSFP112 direct link between the machines.
That direct link is what allowed me to try treating the two GX10s as a local AI cluster instead of two separate computers sitting next to each other.
The hardware side was surprisingly compact. Two machines, a QSFP cable, power monitoring for each node, and dashboards for temperatures, utilization, and system health.
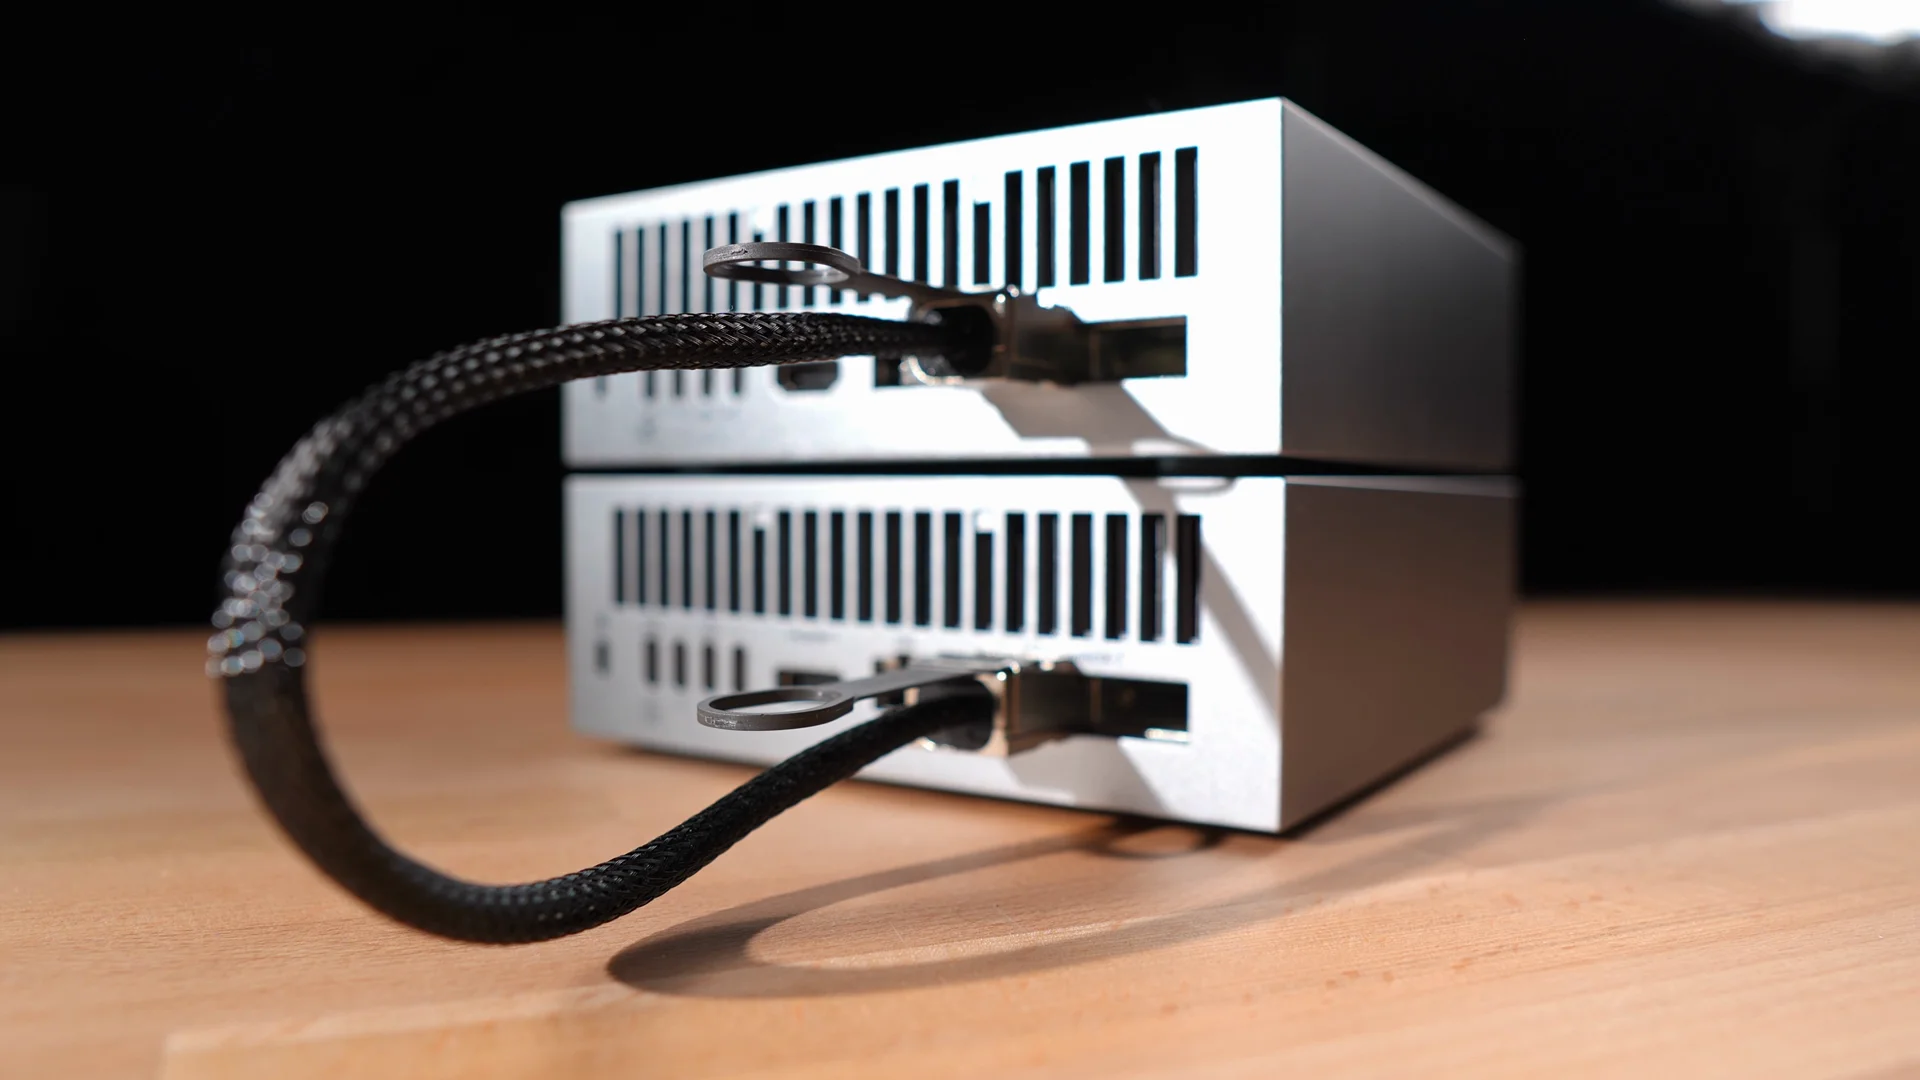 The QSFP112 direct link connecting both GX10s - the high-bandwidth interconnect that makes the two-node cluster possible.
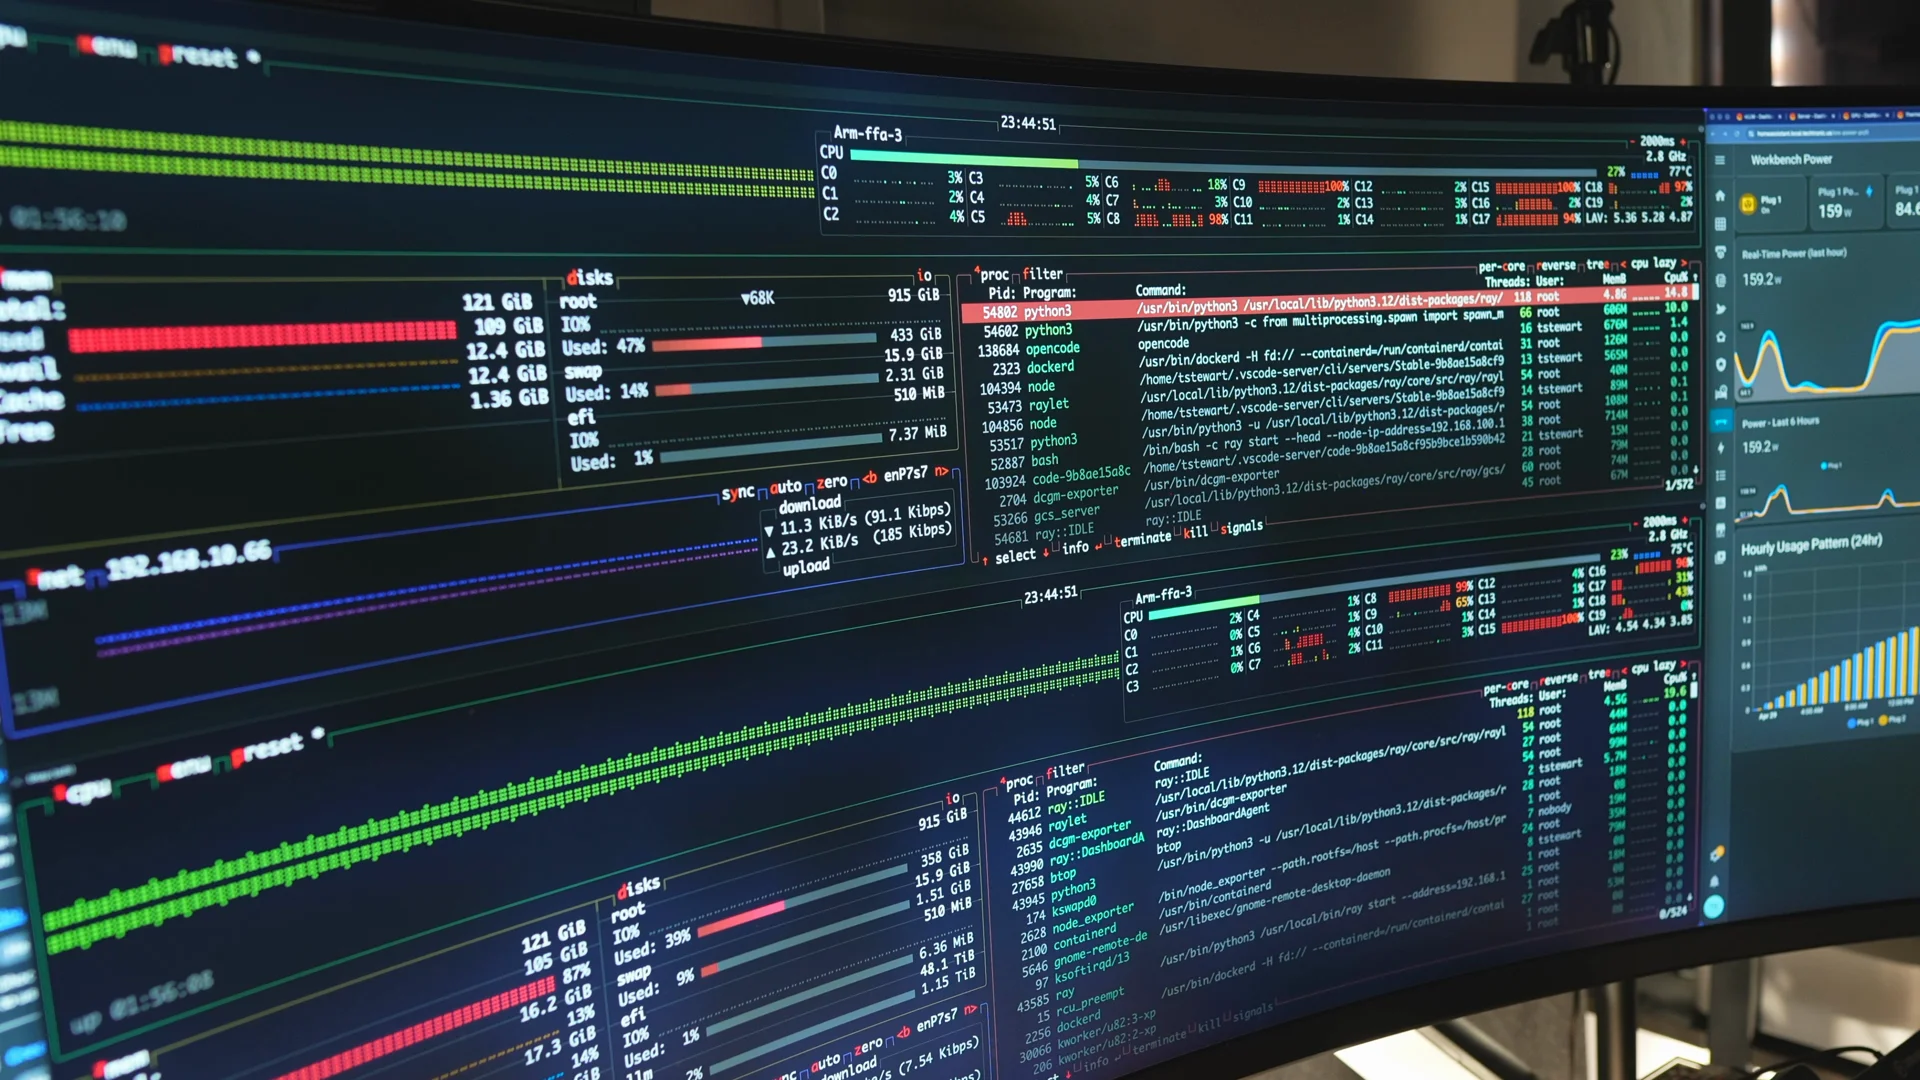 Two btop terminals watching CPU and GPU utilization across both nodes.
The workflow I wanted
I did not want the GX10 to become another computer I had to sit in front of.
I wanted it to act like a remote AI development machine. My normal computer would stay my main workstation, while the GX10 handled the AI workload in the background.
NVIDIA Sync helped with that. I could use VS Code from my main machine, connect to the GX10 remotely, and open a terminal that was actually running on the remote system.
That made the machine feel less like a separate desktop and more like a local AI backend I could work against.
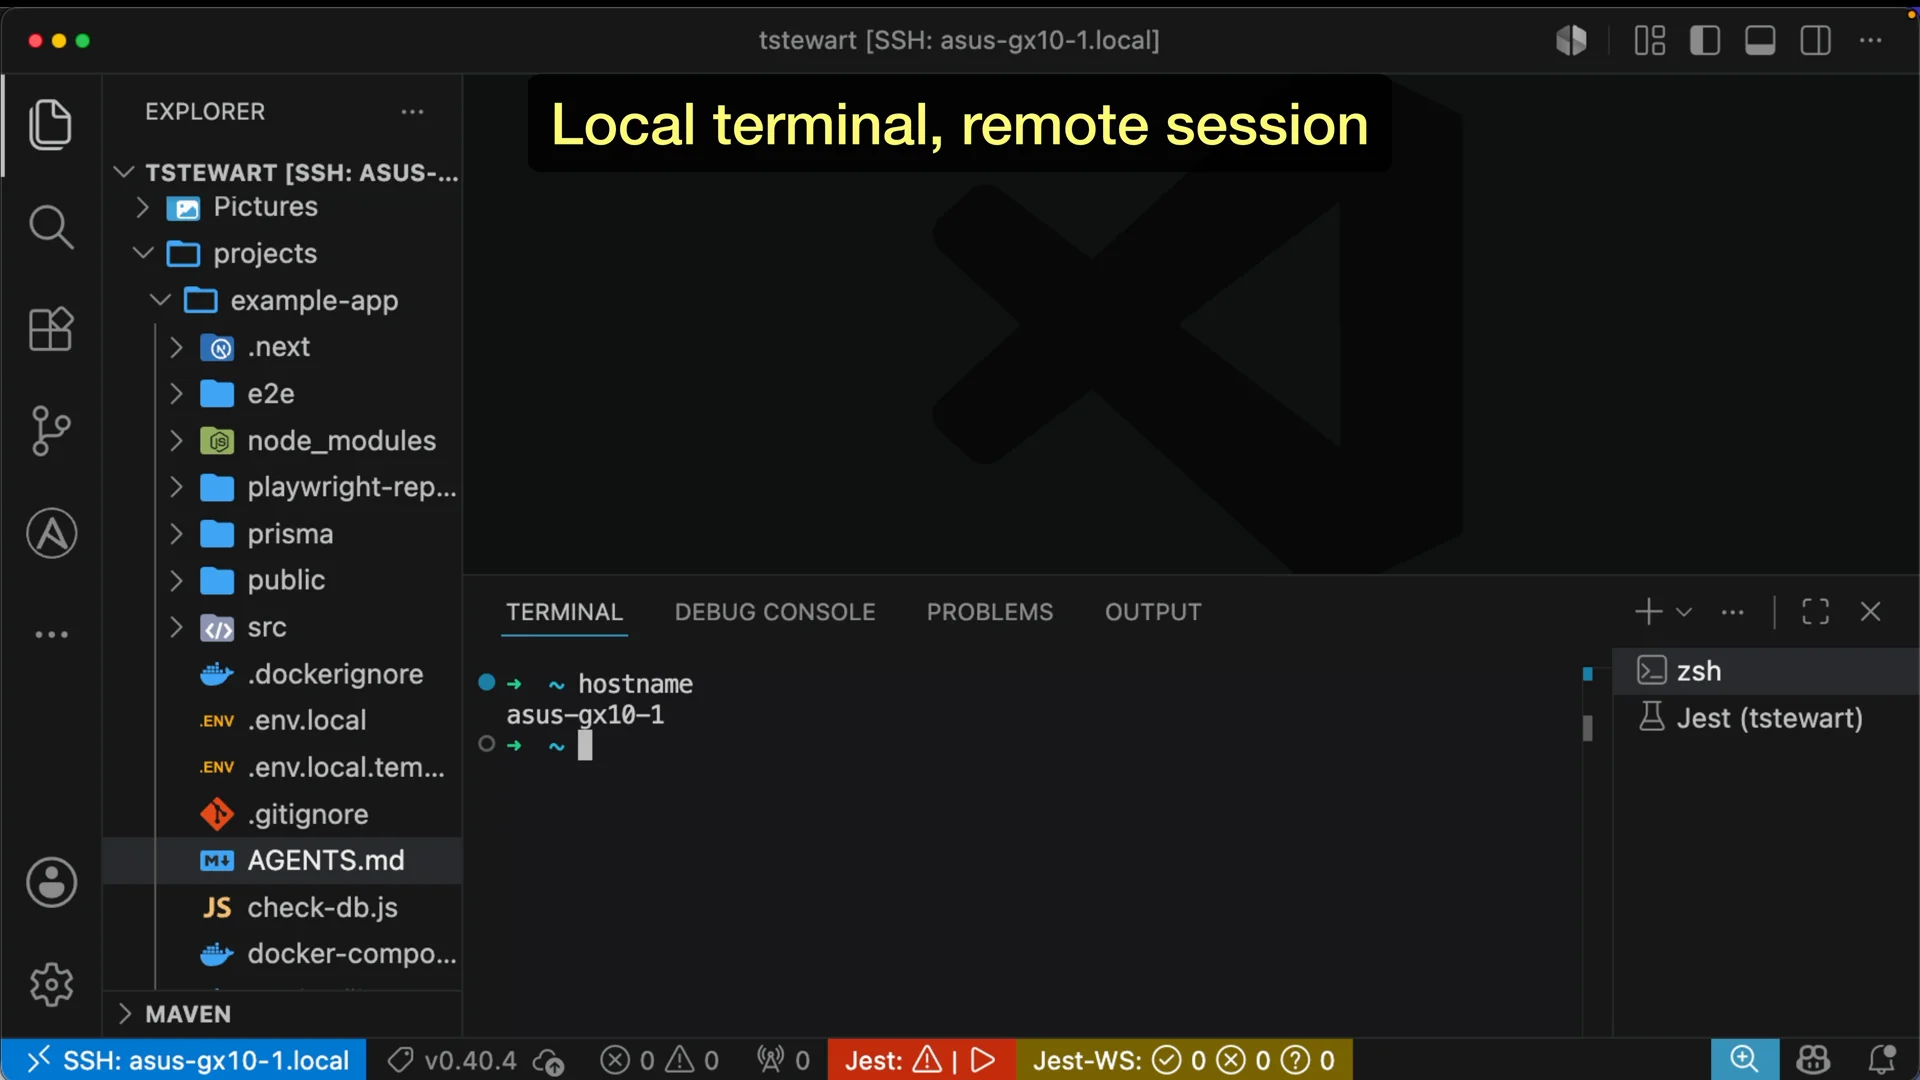 VS Code running locally but connected to the GX10 via NVIDIA Sync - the workspace and terminal are both on the remote machine.
Models on the NAS, vLLM in the middle
Model storage became a problem quickly.
Local models can be tens of gigabytes, over 100GB, or much larger depending on the model and quantization. Rather than filling the GX10’s internal storage, I mounted model storage from my NAS and used the 10GbE connection to pull models from there.
The basic flow was:
- model files live on the NAS
- the GX10 loads the model into memory
- vLLM serves it as a local model endpoint
There are several ways to run models locally. Ollama is probably the easiest place to start. llama.cpp is lightweight and works across a lot of hardware. Docker Model Runner is worth looking at if you want models to fit into a Docker workflow.
For this test, I used vLLM because I wanted a model serving layer, not just a local chat experience. The agent needed an endpoint it could talk to while it worked inside a real project.
The GB10-specific image I ended up building after this test is in github.com/timothystewart6/vllm-gb10, with the full writeup in Running the Latest vLLM on the NVIDIA DGX Spark.
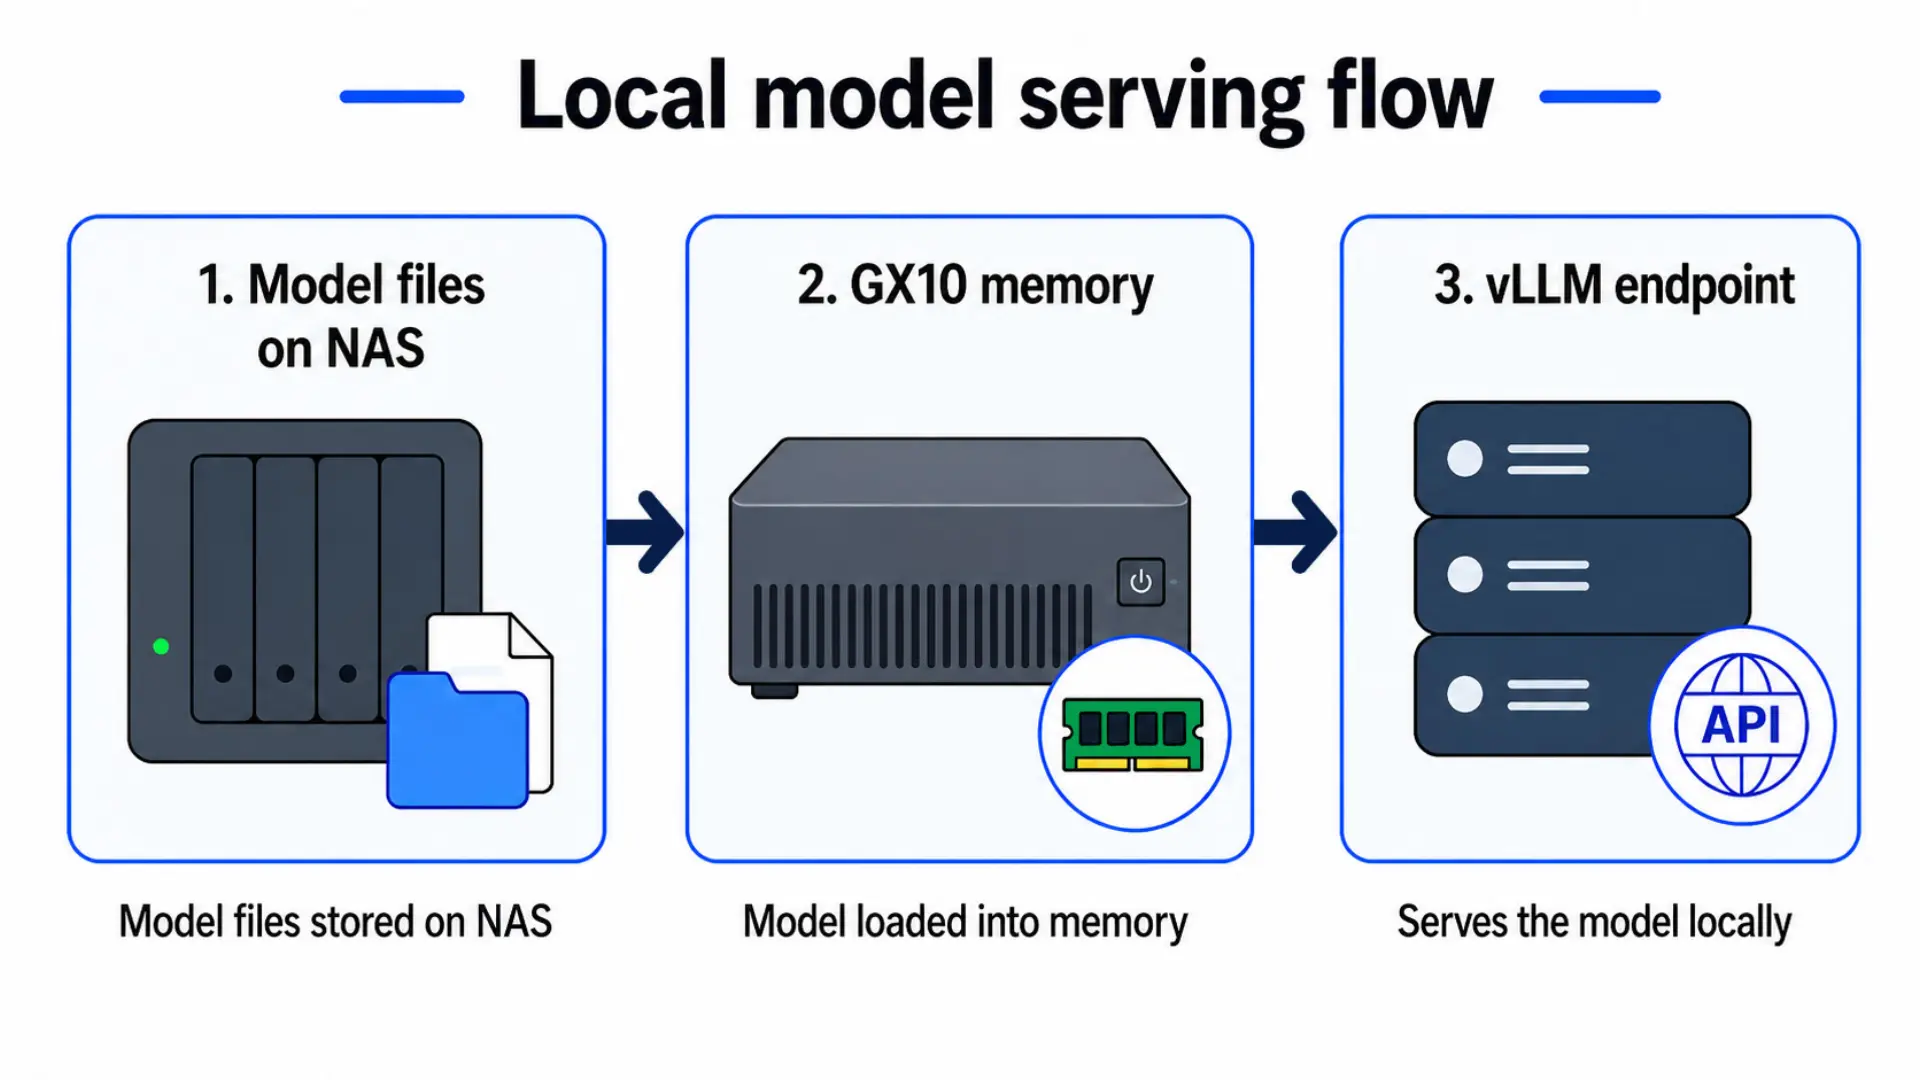 Model files live on the NAS, the GX10 loads them into memory, and vLLM exposes a local endpoint the agent can talk to.
 Common ways to run local models. I used vLLM for this test because I needed a proper serving layer, not just a local chat interface.
Here is the Docker Compose config I used for the single-node run - Qwen3.6-35B-A3B-FP8 served by vLLM:
1
2
3
4
5
6
7
8
9
10
11
12
13
14
15
16
17
18
19
20
21
22
23
24
25
26
27
28
29
30
31
32
33
34
35
36
37
38
39
40
41
42
43
44
45
46
47
48
49
50
51
52
53
54
55
services:
  vllm:
    image: vllm/vllm-openai:v0.19.1-cu130
    container_name: vllm
    restart: unless-stopped
    ipc: host
    ports:
      - "8000:8000"
    volumes:
      # Update this path to match your local model directory.
      # If using a NAS, this should be your NFS mount point.
      - /mnt/llm/models/huggingface:/root/.cache/huggingface
    env_file:
      - .env
    environment:
      - HF_TOKEN=${HF_TOKEN}
      - HUGGING_FACE_HUB_TOKEN=${HF_TOKEN}
      # Force Triton FP8 MoE backend - FLASHINFER_CUTLASS does not support
      # grouped FP8 quantization used by Qwen3.6 MoE layers
      - VLLM_USE_FLASHINFER_MOE_FP8=0
    command:
      - Qwen/Qwen3.6-35B-A3B-FP8
      - --host
      - 0.0.0.0
      - --port
      - "8000"
      - --gpu-memory-utilization
      - "0.8"
      - --kv-cache-dtype
      - fp8
      - --max-num-batched-tokens
      - "4096"
      - --enable-prefix-caching
      - --enable-auto-tool-choice
      - --tool-call-parser
      - qwen3_coder
      - --reasoning-parser
      - qwen3
      - --language-model-only
      - --async-scheduling
      - --disable-access-log-for-endpoints
      - /health
    deploy:
      resources:
        reservations:
          devices:
            - driver: nvidia
              count: all
              capabilities: [gpu]
    healthcheck:
      test: ["CMD", "curl", "-sf", "http://localhost:8000/health"]
      interval: 30s
      timeout: 10s
      retries: 40
      start_period: 900s
The .env file just needs your Hugging Face token:
1
HF_TOKEN=your_huggingface_token_here
OpenCode as the agent
Once vLLM was serving the model, I needed something that could actually use it. OpenCode filled that gap.
OpenCode gave the model access to the project and terminal. It could inspect files, edit code, run commands, see errors, and attempt fixes.
The stack was simple in concept:
- GX10 runs the model
- vLLM serves the model
- OpenCode edits the project
That was the actual workflow I wanted to test. Not whether a local model could answer questions, but whether it could work inside a real project.
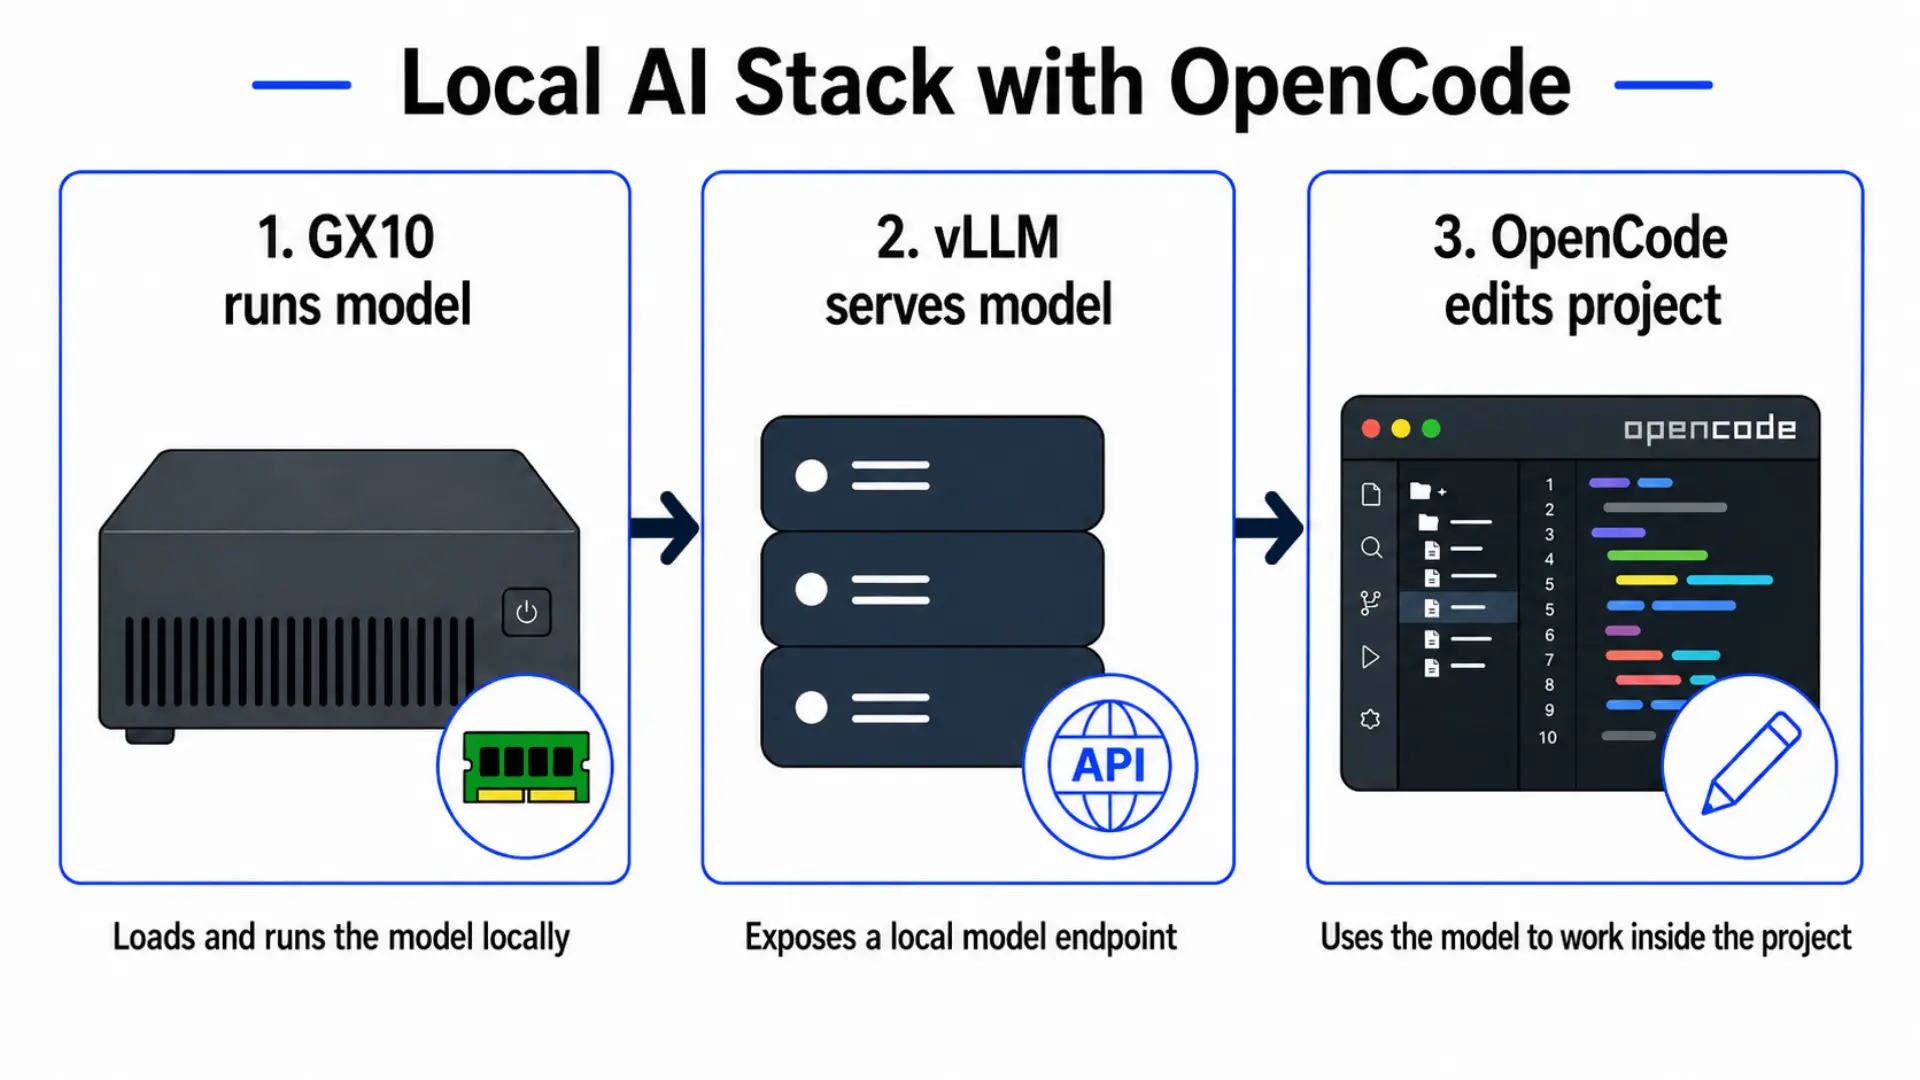 The three-layer stack: the GX10 runs the model, vLLM exposes a local endpoint, and OpenCode uses that endpoint to work inside the project.
The test project
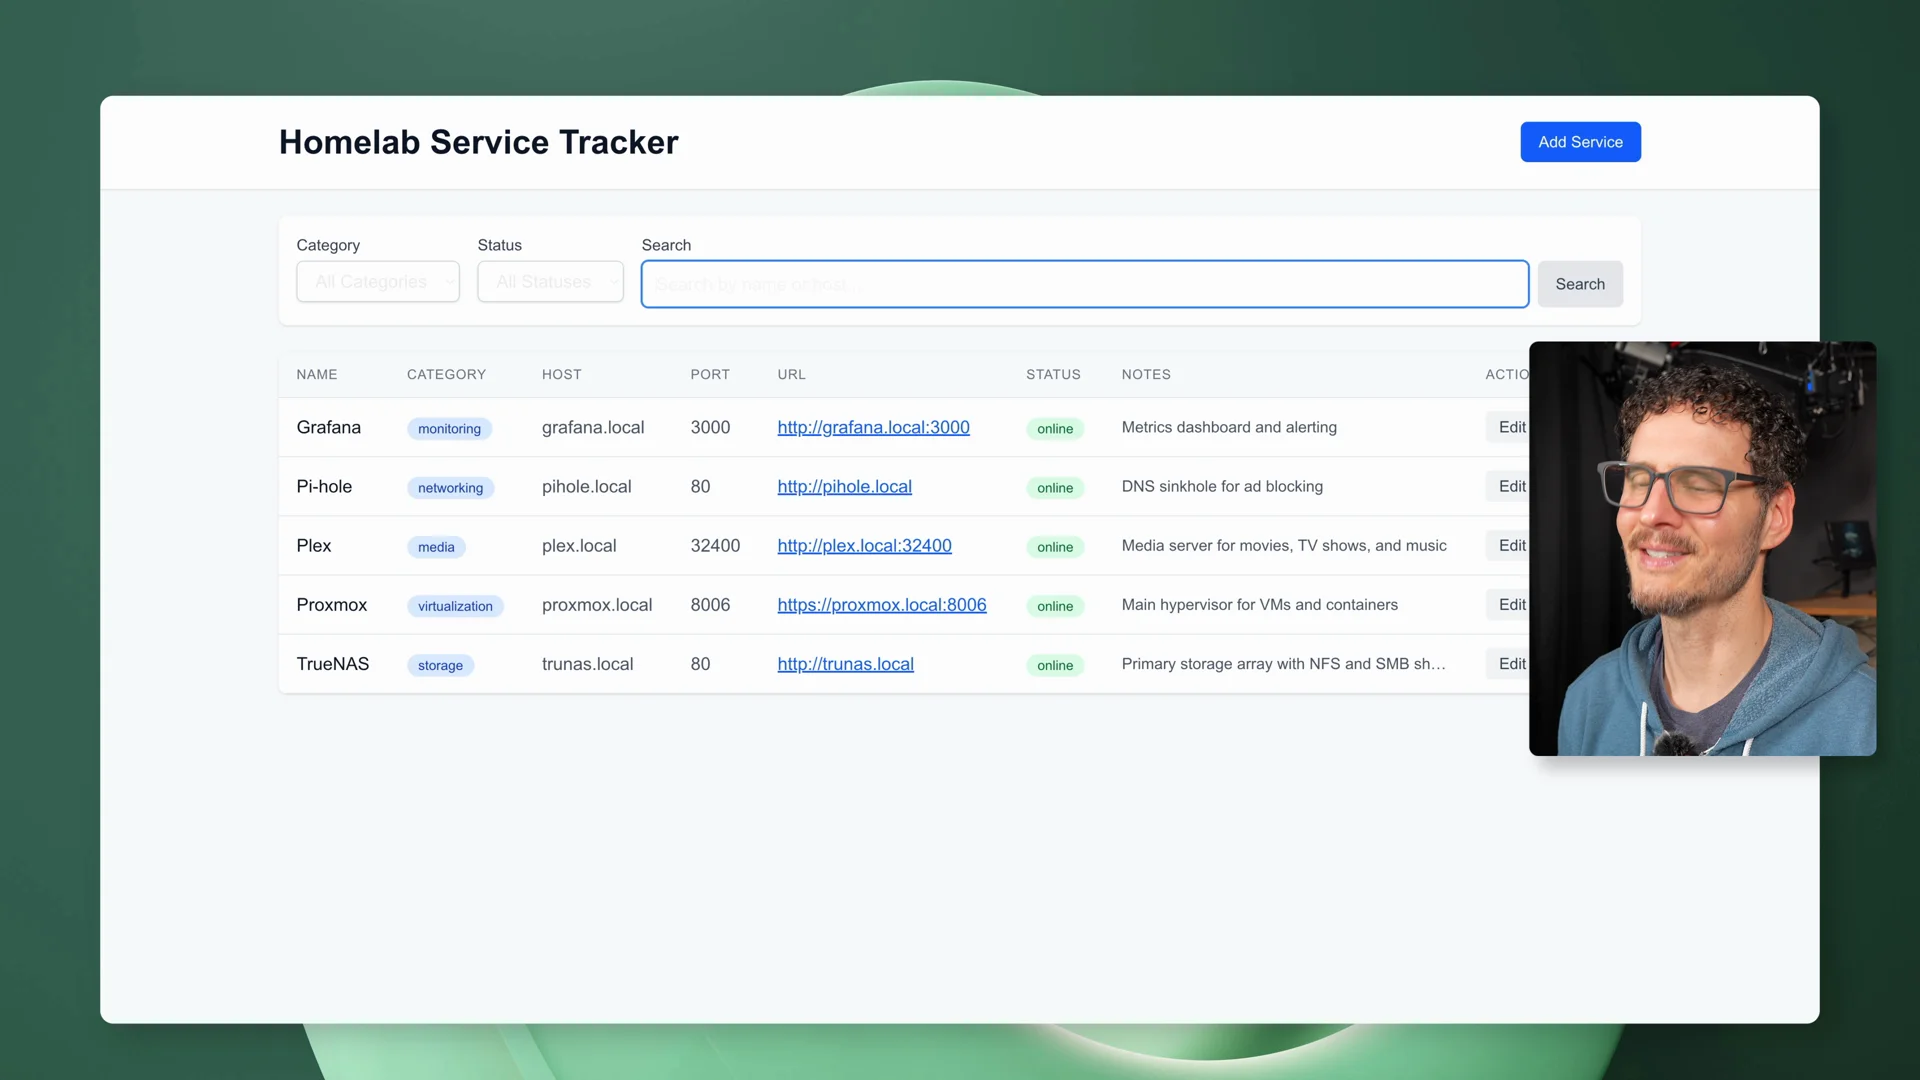
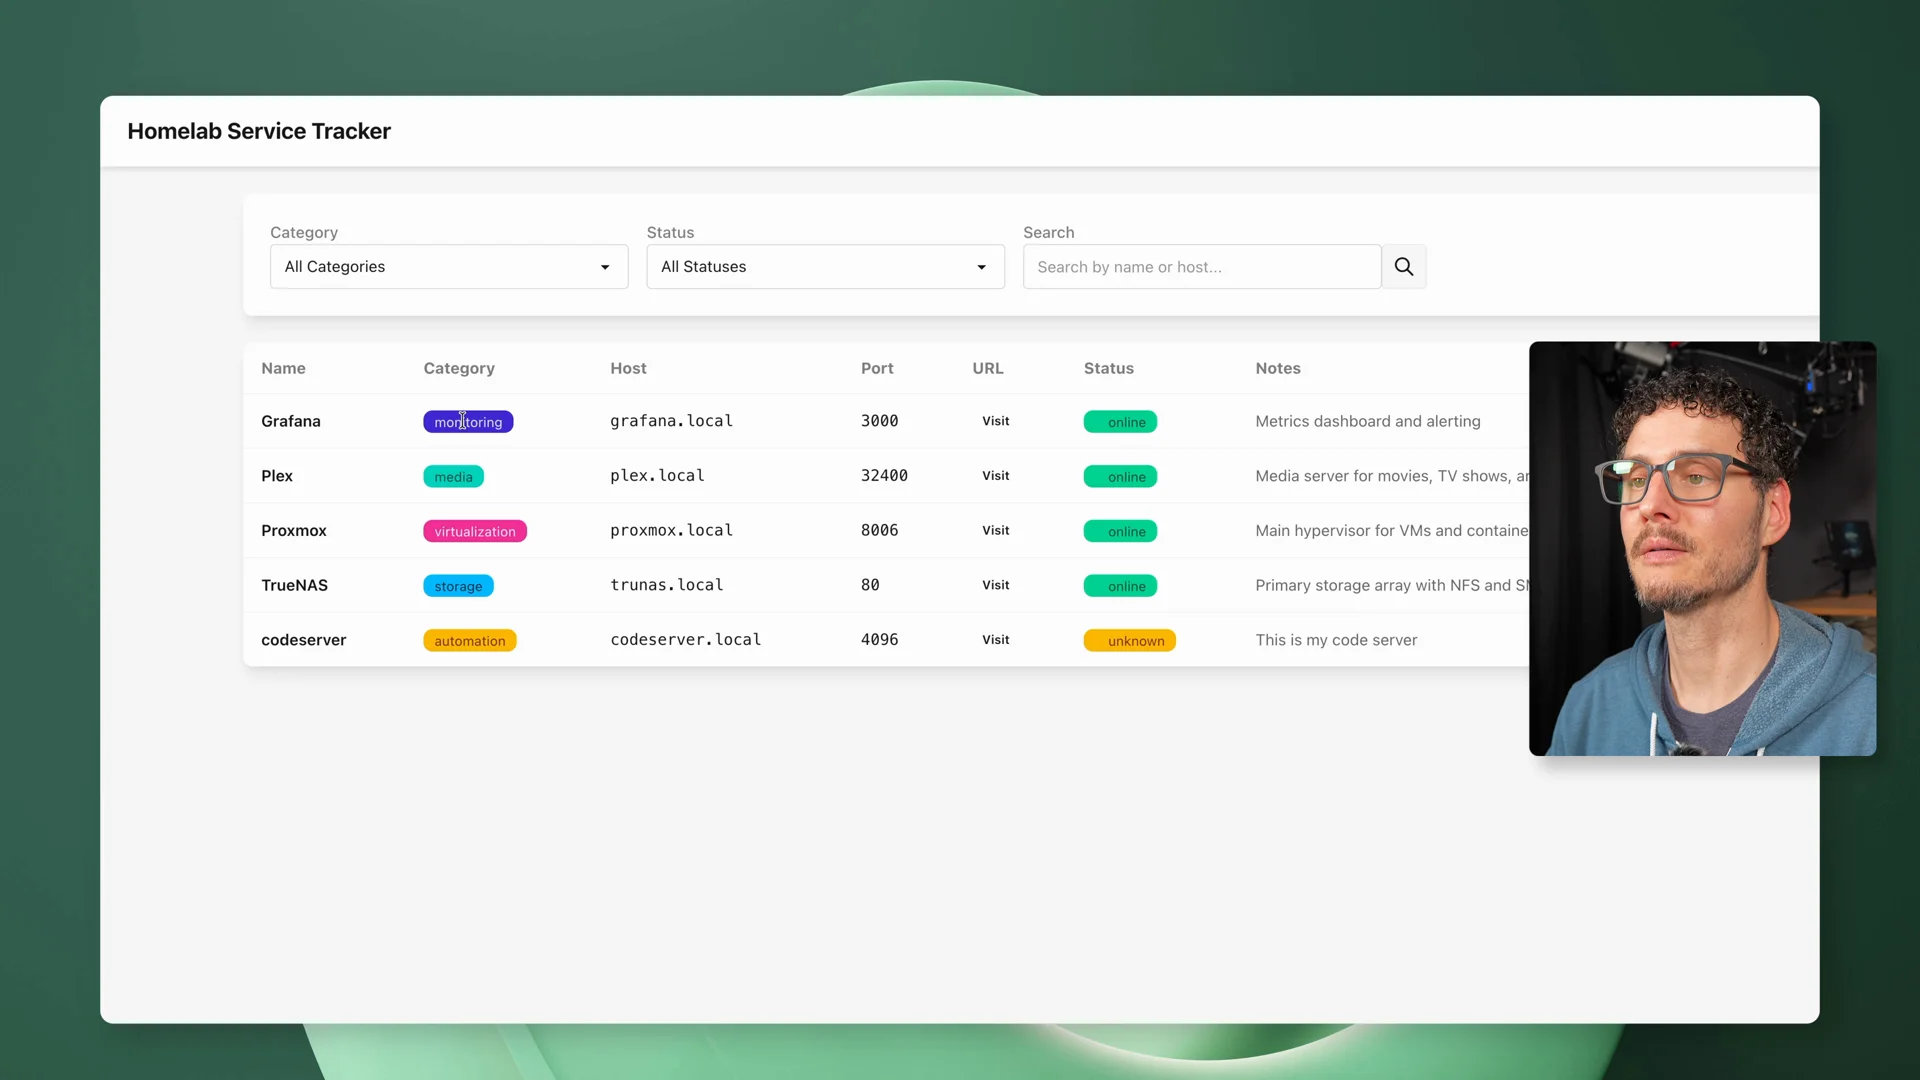
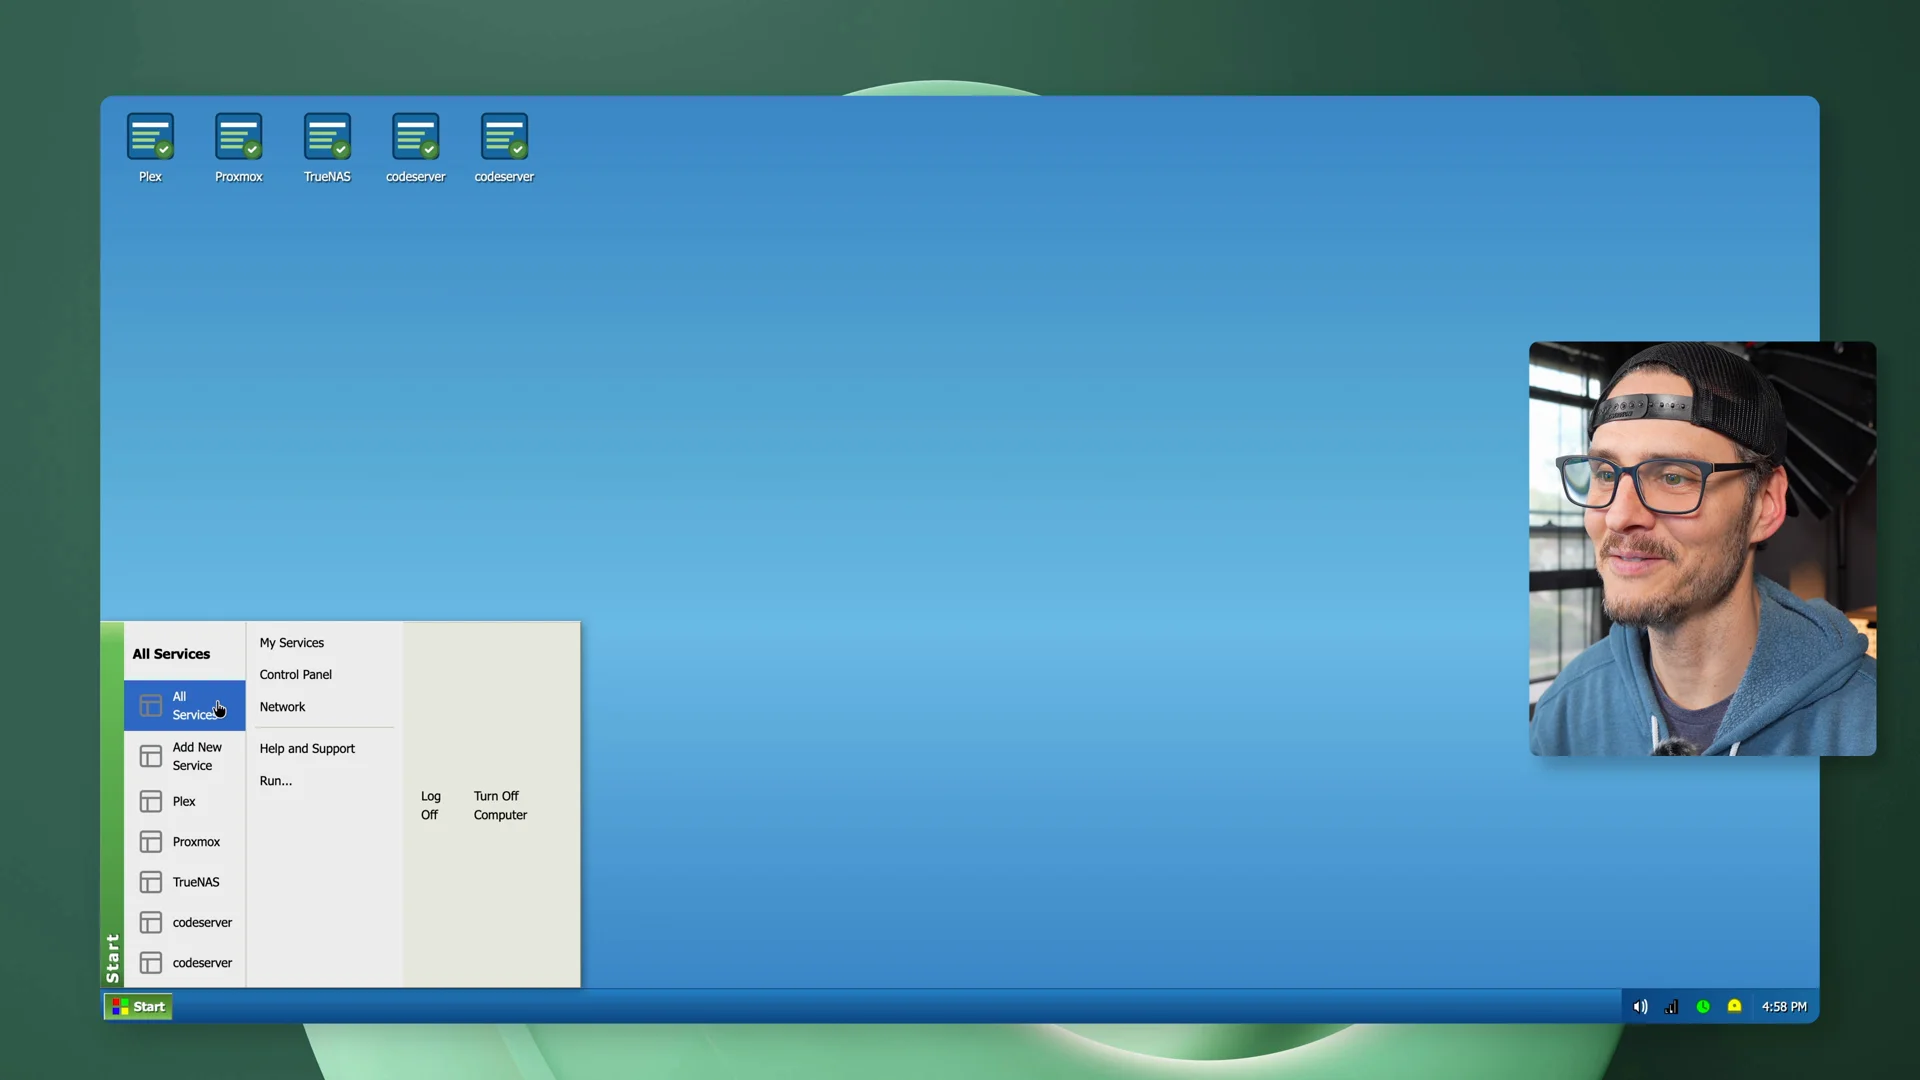
For the test, I asked the agent to build a Homelab Service Tracker.
It’s a small app for tracking services like Proxmox, TrueNAS, Grafana, Plex, and Pi-hole. That made it familiar enough to be realistic, but contained enough that I could judge whether the agent had actually completed the task.
The prompt included the stack, scope, data model, test requirements, and definition of done. I also told it what not to build.
View the full agent prompt
You are working in an empty project folder.
Your goal is to autonomously build a production-ready web app and not stop until the app fully works, the tests pass, and the project is ready to ship.
Favor completion and correctness over ambitious features. Favor the simplest correct implementation that satisfies the requirements. Do not expand scope unless expansion is required to satisfy the existing requirements.
Project: Build a Next.js TypeScript homelab service tracker using Tailwind CSS, Prisma, and PostgreSQL.
Product scope: This app is a simple CRUD tracker for homelab services. Keep it minimal, clean, and reliable. Do not add extra features beyond the defined scope unless necessary to complete the app.
Core features:
- View a list of services
- Add a service
- Edit a service
- Delete a service
- Filter services by category
- Filter services by status
- Optionally search services by name or host
- Seed the database with example services
Service data model — each service must have:
- name
- category
- host
- port
- url
- status
- notes
Status must be one of: online, offline, unknown
Category must be one of: storage, virtualization, media, monitoring, networking, automation
Seed data requirements — seed the database with at least these example services:
- Proxmox
- TrueNAS
- Plex
- Grafana
- Pi-hole
Each seeded service should include all required fields with realistic example values for hostnames, ports, URLs, and notes.
App runtime requirements:
- The app must run on port 3100
- Docker Compose must expose the app on port 3100
- README instructions must use port 3100 consistently
- End-to-end tests should assume the app runs on port 3100
Out of scope:
- authentication, user accounts, live service health checks, background jobs, external APIs, charts or analytics, notifications, websockets, complex dashboard widgets, multi-user support
Technical requirements:
- Use TypeScript everywhere
- Use Next.js App Router
- Use Tailwind CSS
- Use Prisma ORM
- Use PostgreSQL
- Use Vitest for unit/integration tests
- Use Playwright for end-to-end tests
- Use Docker Compose to run the app and PostgreSQL together
- Prefer simple, conventional architecture over cleverness
Required pages and UX:
- A main page that lists all services
- A way to create a new service
- A way to edit an existing service
- A way to delete a service with confirmation
- Filtering controls for category and status
- A clean empty state if no services exist
Autonomous workflow requirements:
First create: SPEC.md, TASKS.md, AGENTS.md, PROGRESS.md
SPEC.md must define: scope, features, data model, routes/pages, testing plan, Docker/database plan, definition of done. TASKS.md must break the project into small, checkable tasks. AGENTS.md must define the working loop and project rules. PROGRESS.md must be updated as work is completed.
Work in this loop:
- Read SPEC.md
- Choose the next unchecked task from TASKS.md
- Implement that task
- Write or update tests for that feature
- Run lint, type checking, and relevant tests
- If something fails, fix it before moving on
- Update TASKS.md and PROGRESS.md
- Repeat until all tasks are complete
Quality gates — after each feature: update tests, run lint, run typecheck, run relevant tests.
Before declaring completion:
- CRUD flows must work
- Filters must work
- Prisma schema must be complete and migrations must work
- Seed data must work
- App must build and run on port 3100
- Lint, type checking, unit/integration tests, and end-to-end tests must pass
- Docker Compose must run the app and database successfully
- README must be accurate
Testing requirements — end-to-end tests that verify a user can:
- View seeded services
- Add a service
- Edit a service
- Delete a service
- Filter by category
- Filter by status
Behavior requirements:
- Work autonomously — do not stop at planning, scaffolding, or unverified code
- Do not stop if tests, lint, or type checking fail — fix and continue
- Continue until the project is actually working and verified
Definition of done: The project is done only when the app works, all features are implemented, migrations and seed data work, the app runs on port 3100, lint/typecheck/tests/e2e all pass, Docker Compose works, documentation is complete, and TASKS.md is fully checked off.
Start by creating SPEC.md, TASKS.md, AGENTS.md, and PROGRESS.md, then begin implementation.
That mattered because agents can wander. If the task is too open ended, it becomes harder to tell whether the result is good or whether the agent simply built something adjacent to what you asked for.
I also asked it to create spec, task, agent, and progress files before implementation, then work through the project step by step. The goal was to force a more structured coding-agent workflow instead of having it build a whole app first and clean up later.
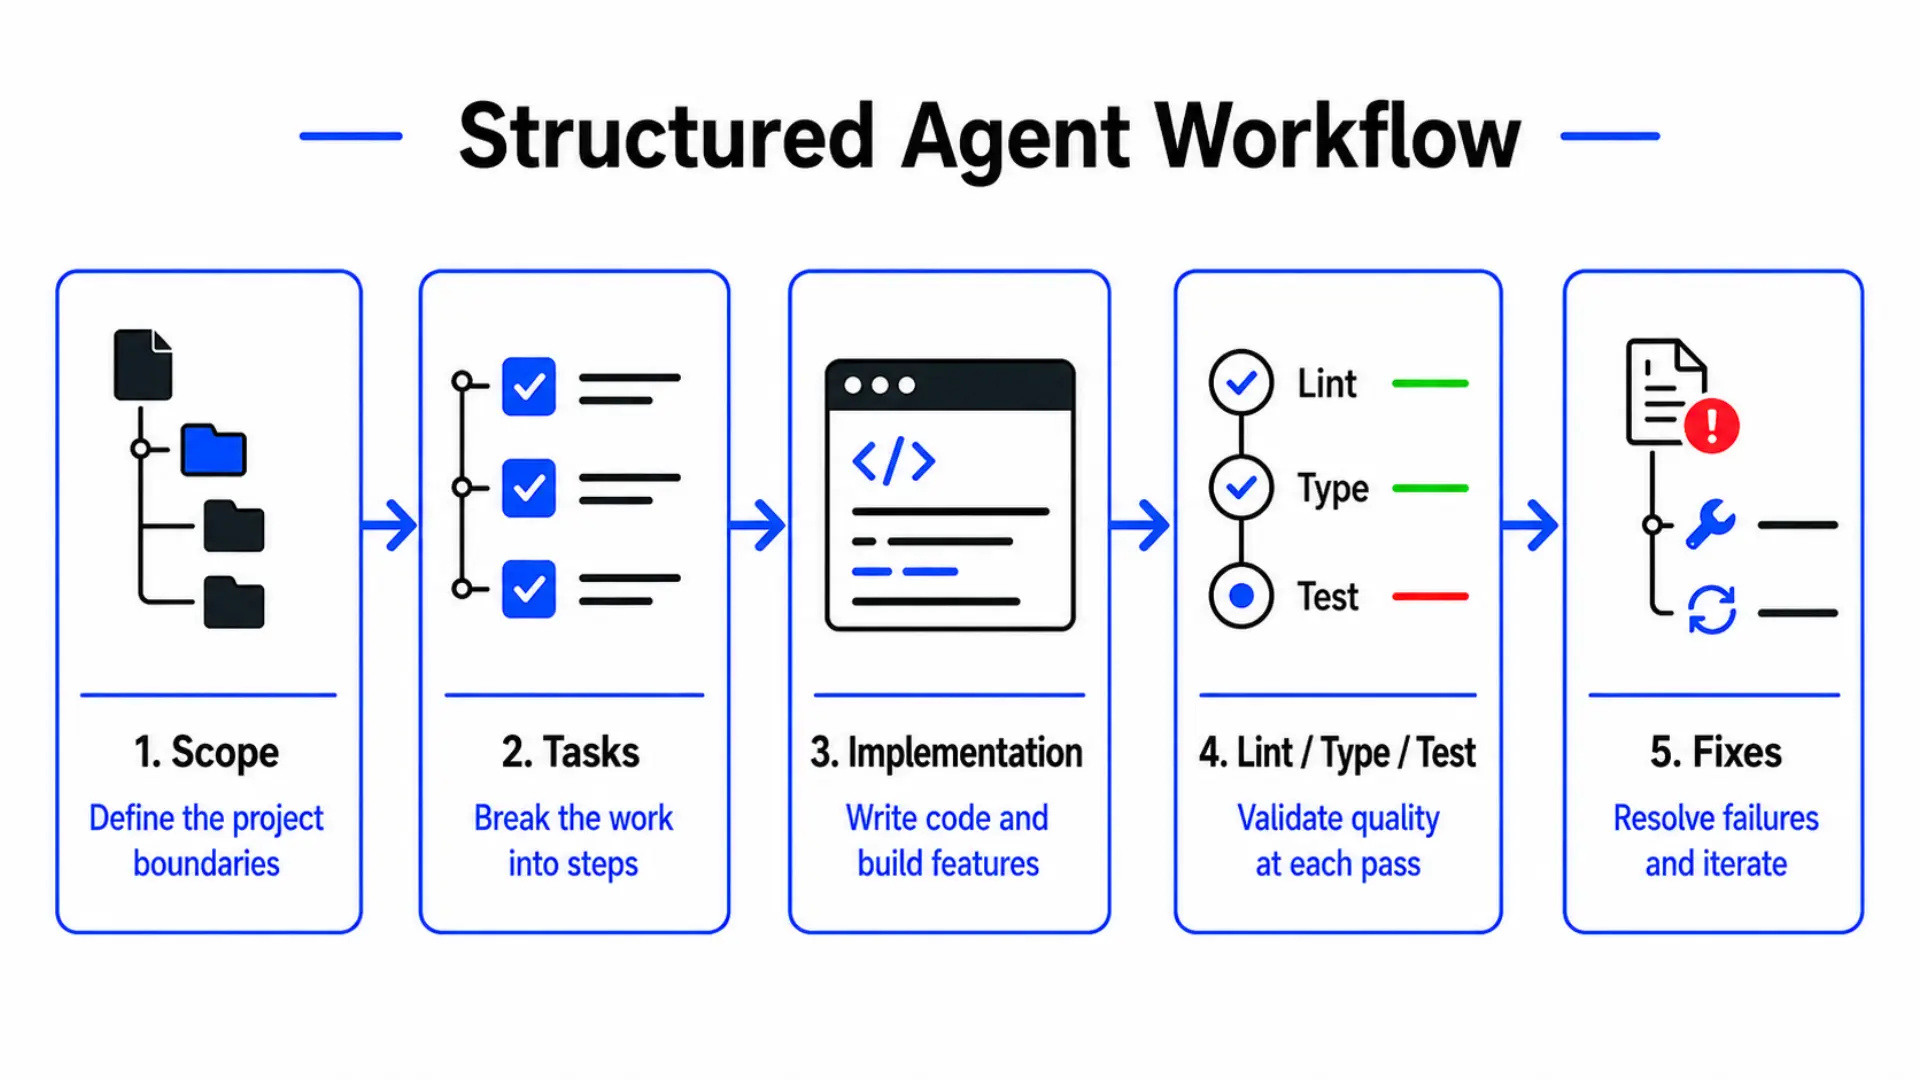 The structured agent workflow I used: scope the project, break it into tasks, implement, validate with lint and tests, then fix and iterate.
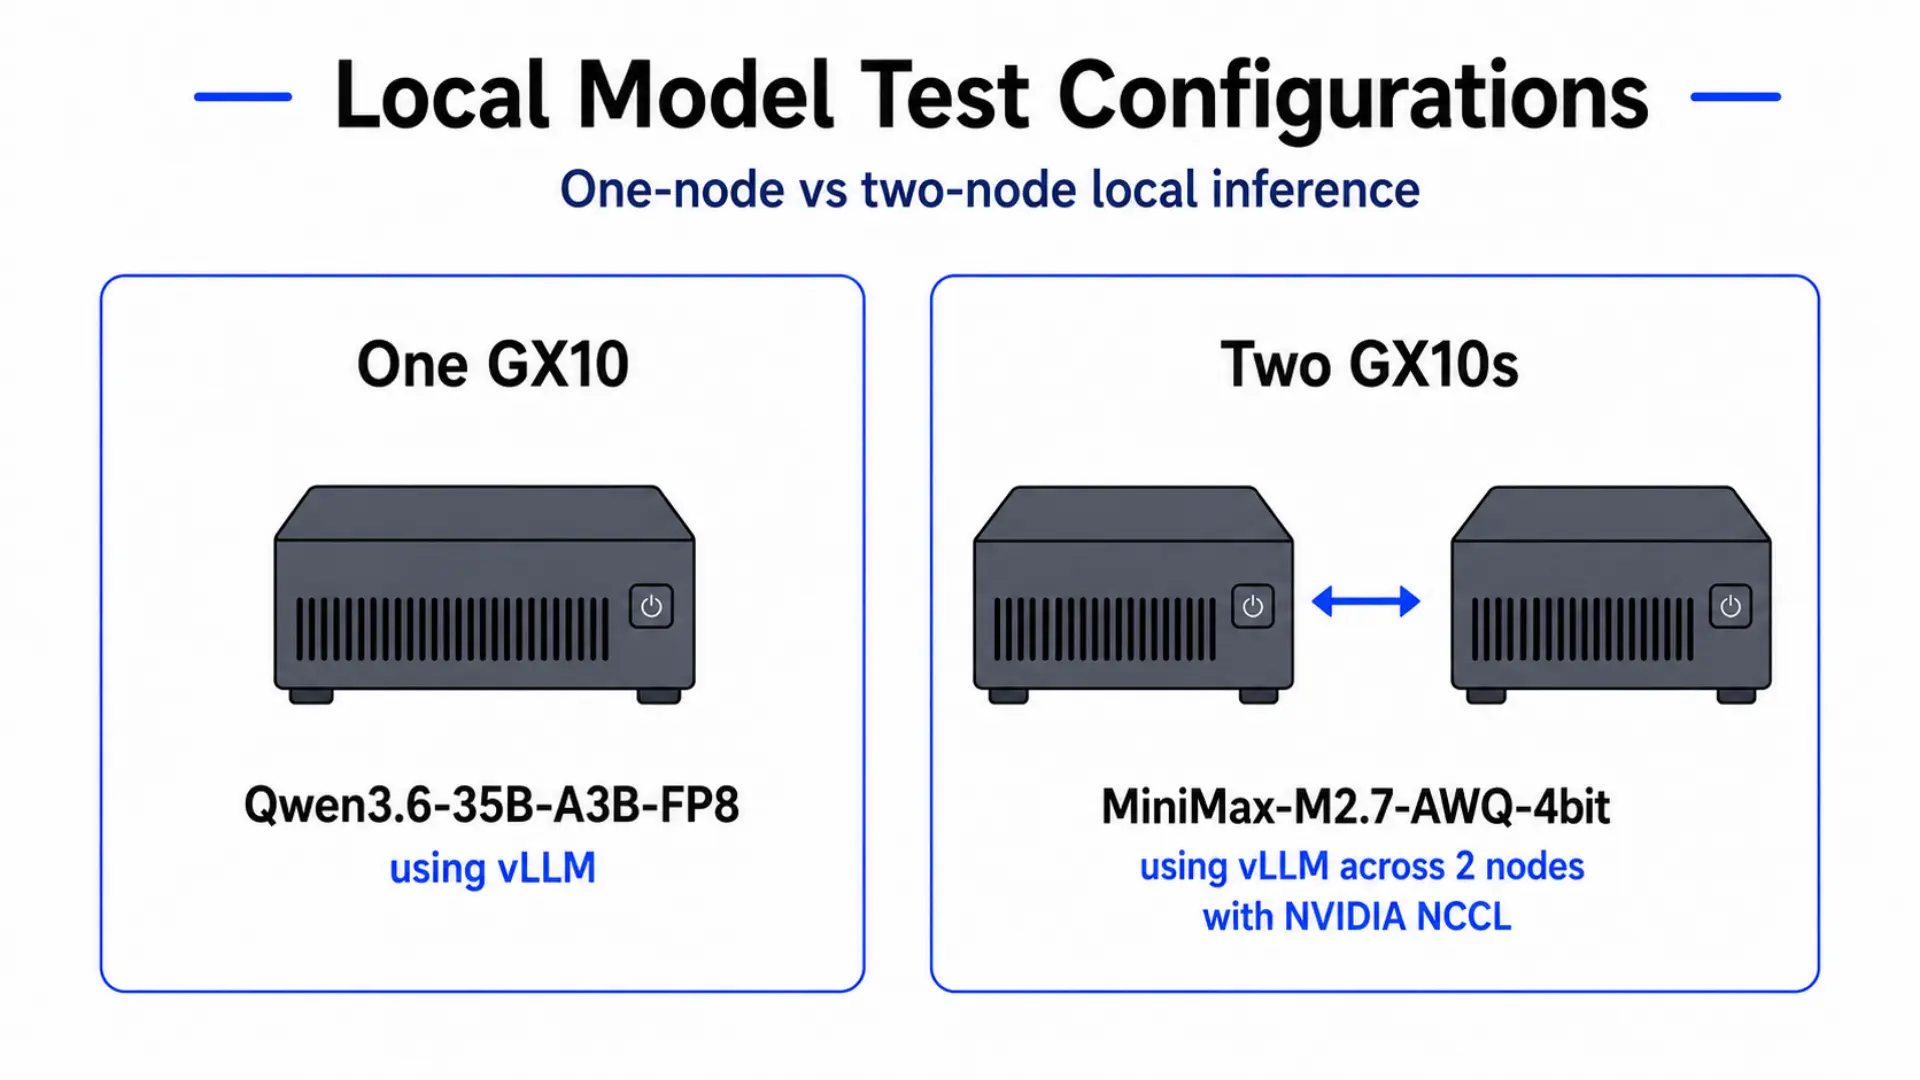
Test 1: one GX10
The first run was the practical version: one GX10, vLLM, OpenCode, and a local coding model.
The result was mixed in a useful way.
It did build the app. It created planning files, moved through the task, generated the project, and eventually got a working version running locally.
But it was not hands-off.
It got stuck in tool calls. It asked for permissions. At one point the agent said it was thinking, but the vLLM dashboard showed that the model was not really doing anything. My default intervention was just to tell it to continue because I did not want to over-steer the run.
When the app finally launched, it had real issues. Filtering did not seem right, and updating a service produced a 405 error. I asked the agent to fix the edit, filter, and save issues and write an end-to-end regression test. It started looping again, so I had to narrow the task and tell it to focus on filtering first.
That helped. It looked up the documentation, figured out the search params issue, and fixed the bug.
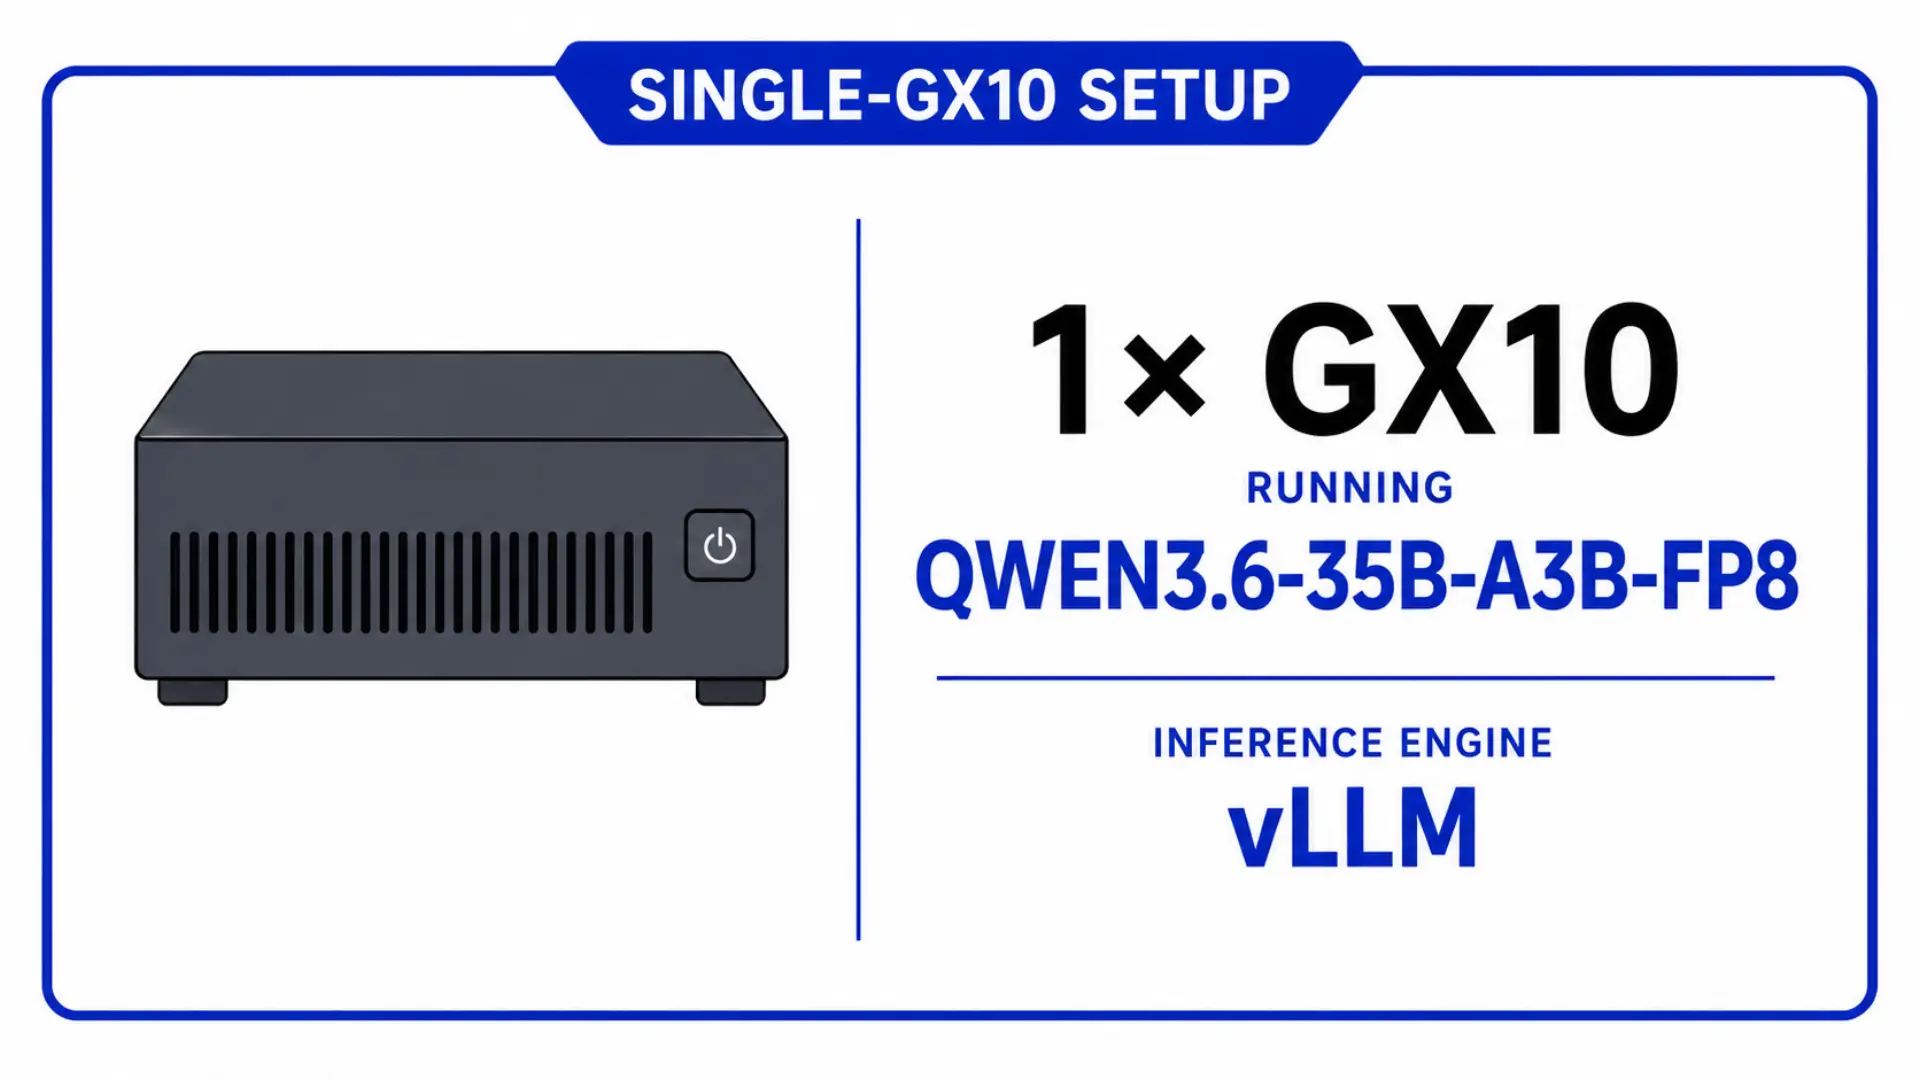 Single-GX10 setup: one machine running Qwen3.6-35B-A3B-FP8 via vLLM.
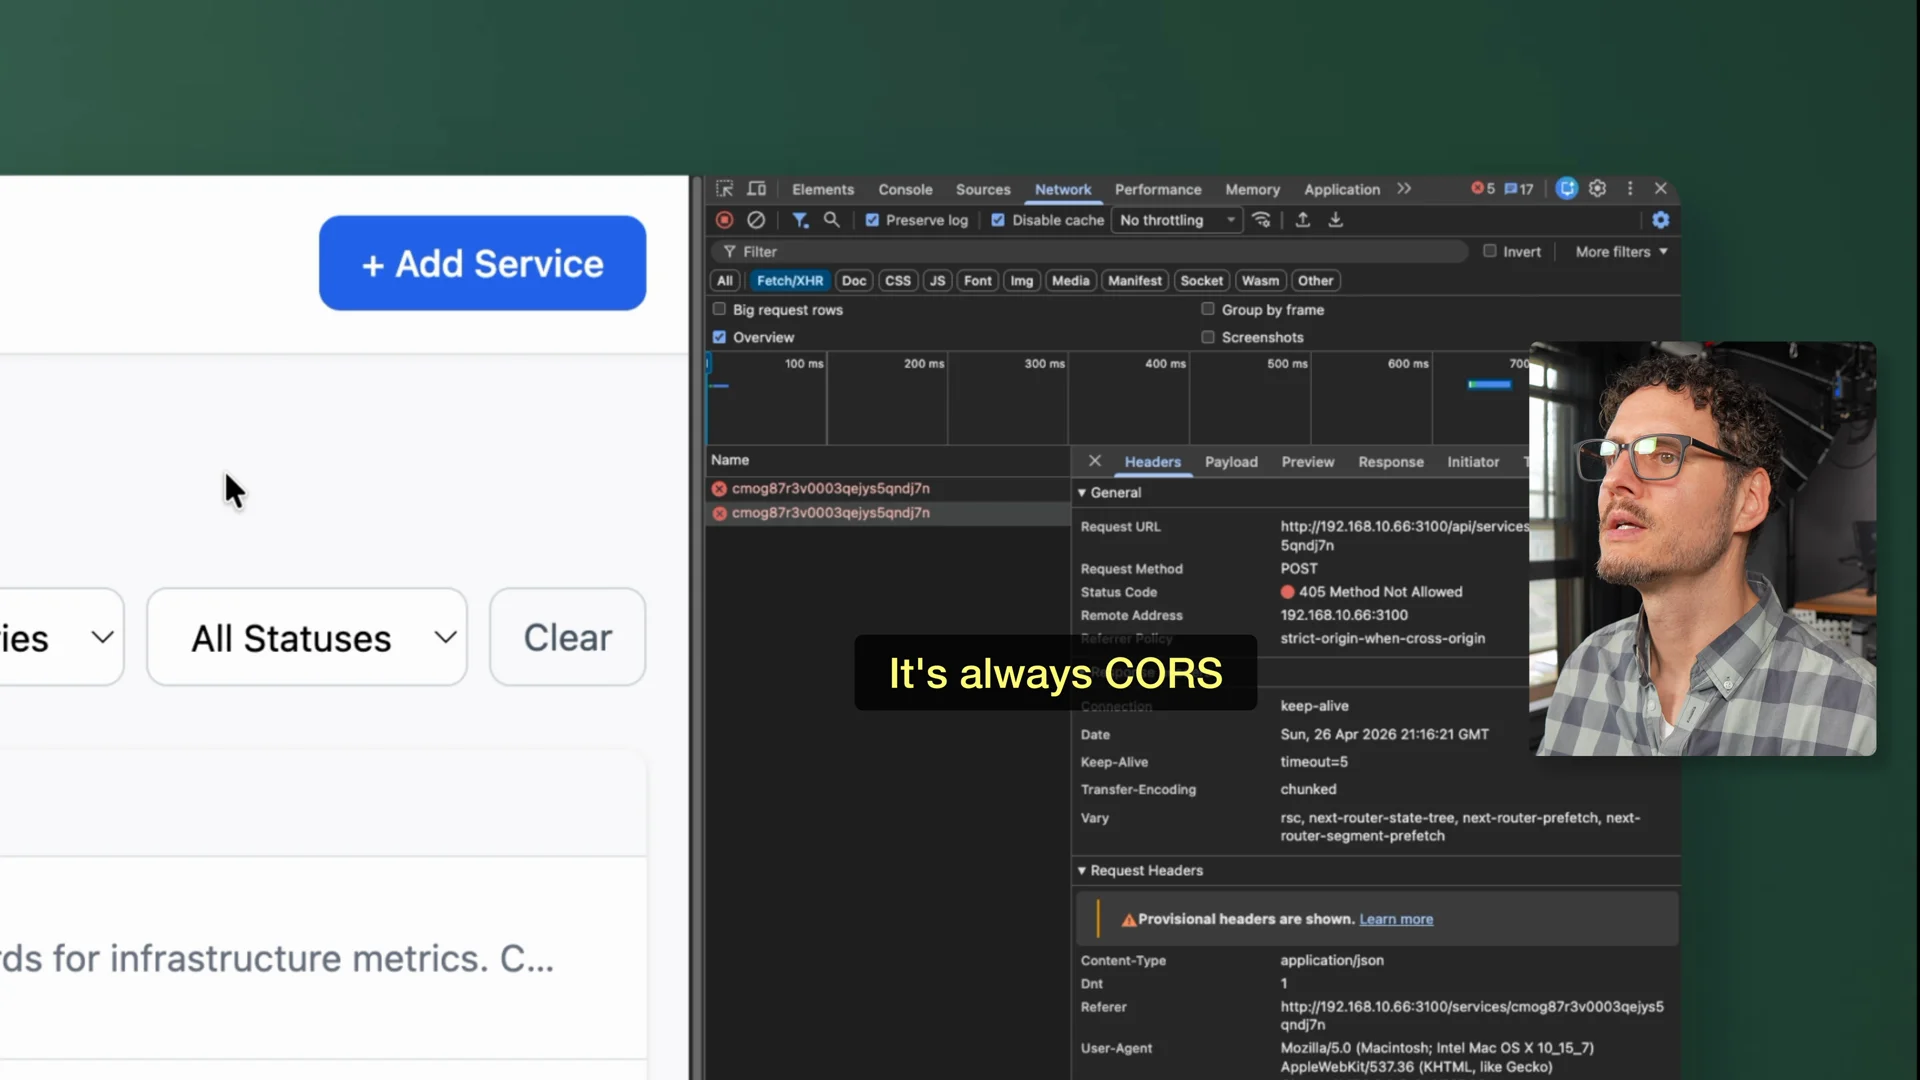 The 405 error on edit and save during the single-GX10 run. A nudge to check the docs fixed it.
The takeaway from the one-GX10 run was pretty clear.
Yes, one GX10 can do useful local coding work. But I would not call it autonomous. It needed steering, and some of the friction may have been the model, some may have been OpenCode, and some may have been the interaction between all the pieces.
Still, the workflow worked.
Power draw on one GX10
During the single-node run, I watched power in Home Assistant.
Node one was doing the work. Node two was idle. Under load, I saw the active node pulling around 125 to 127 watts.
With the model loaded but idle, I saw about 50 watts. That was a useful reminder that even if the model itself is not charging per token, electricity still matters.
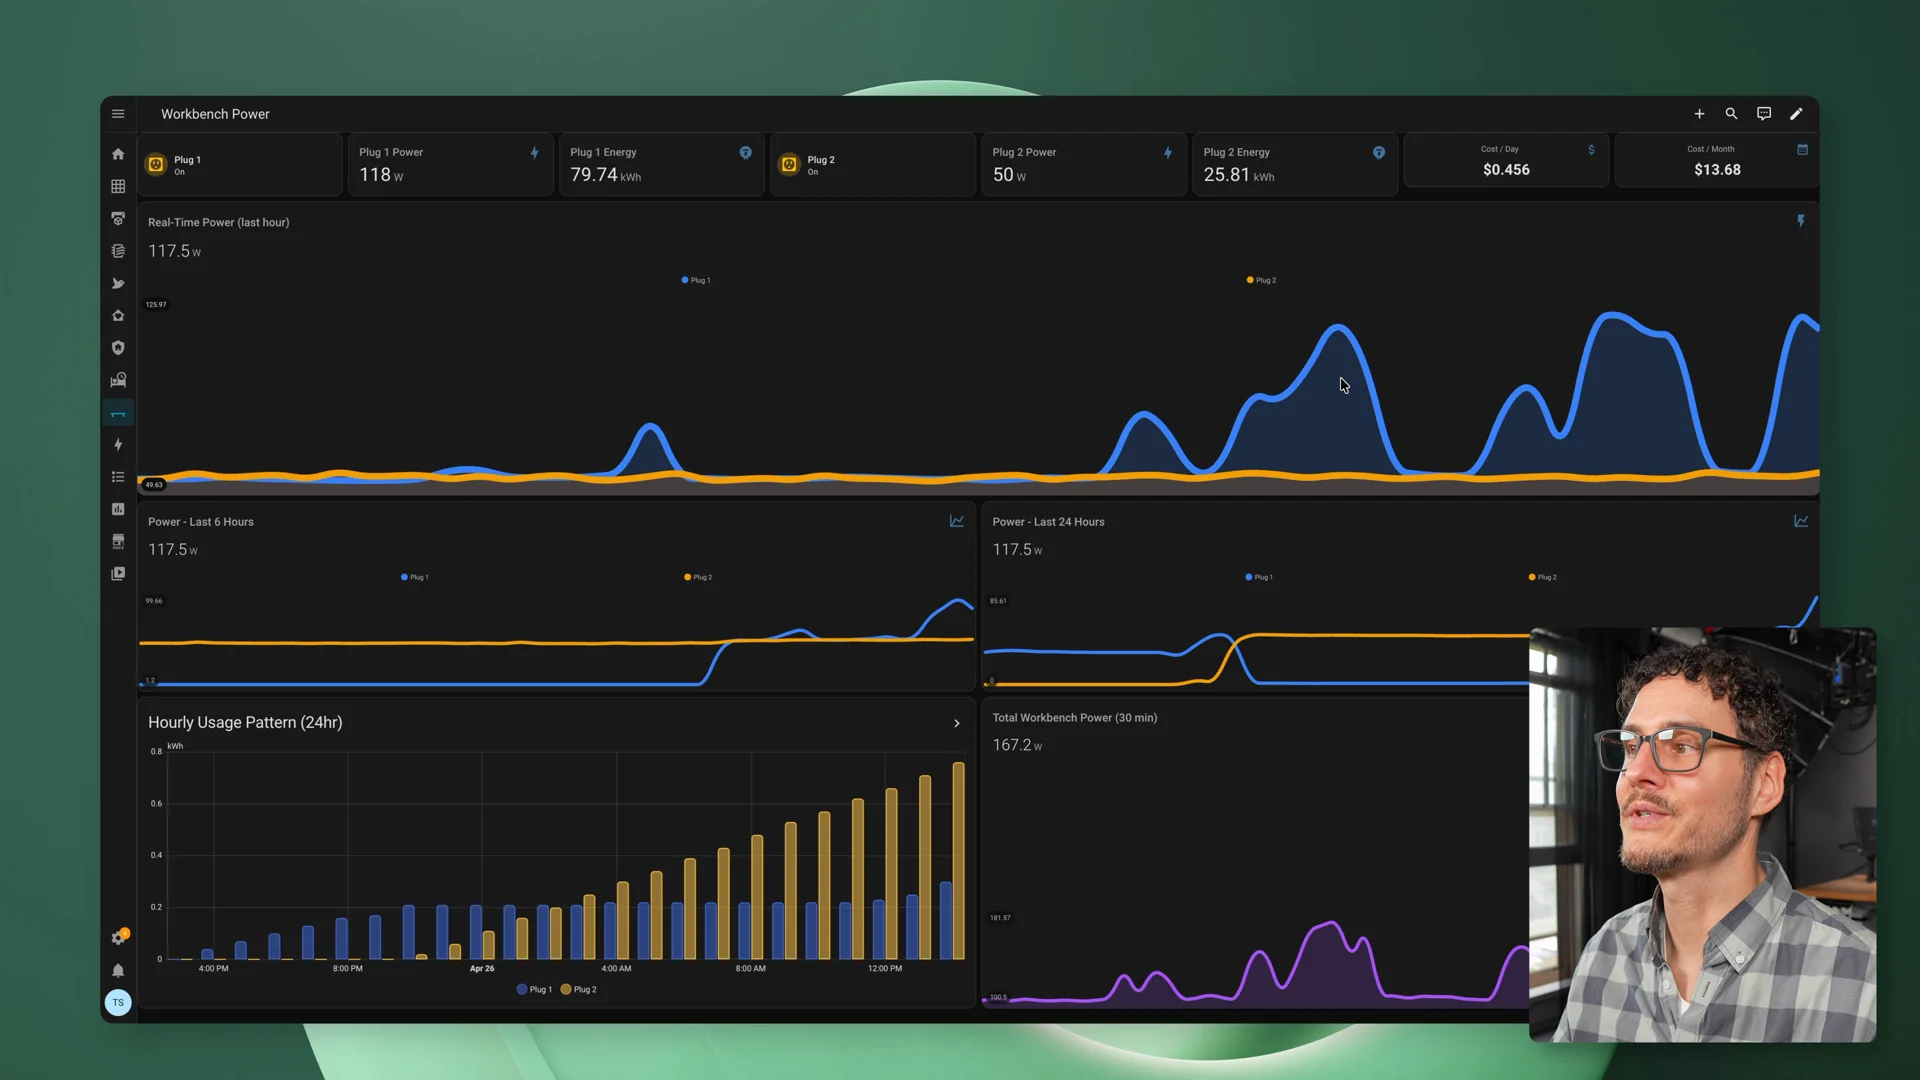 Home Assistant showing node one during the single-GX10 run - around 127W at this moment, which works out to roughly $13/month if left running continuously.
Test 2 needed a real cluster
The second GX10 had to prove something different.
If one GX10 can already run a useful local coding workflow, then the second machine only really matters if it changes the class of models or workflows I can run.
Before testing that, I needed the two-node cluster to work.
vLLM was configured as a two-node Ray cluster, with one GX10 acting as the head node and the other acting as the worker. The machines were connected over the QSFP direct link, and NCCL handled GPU communication across the nodes.
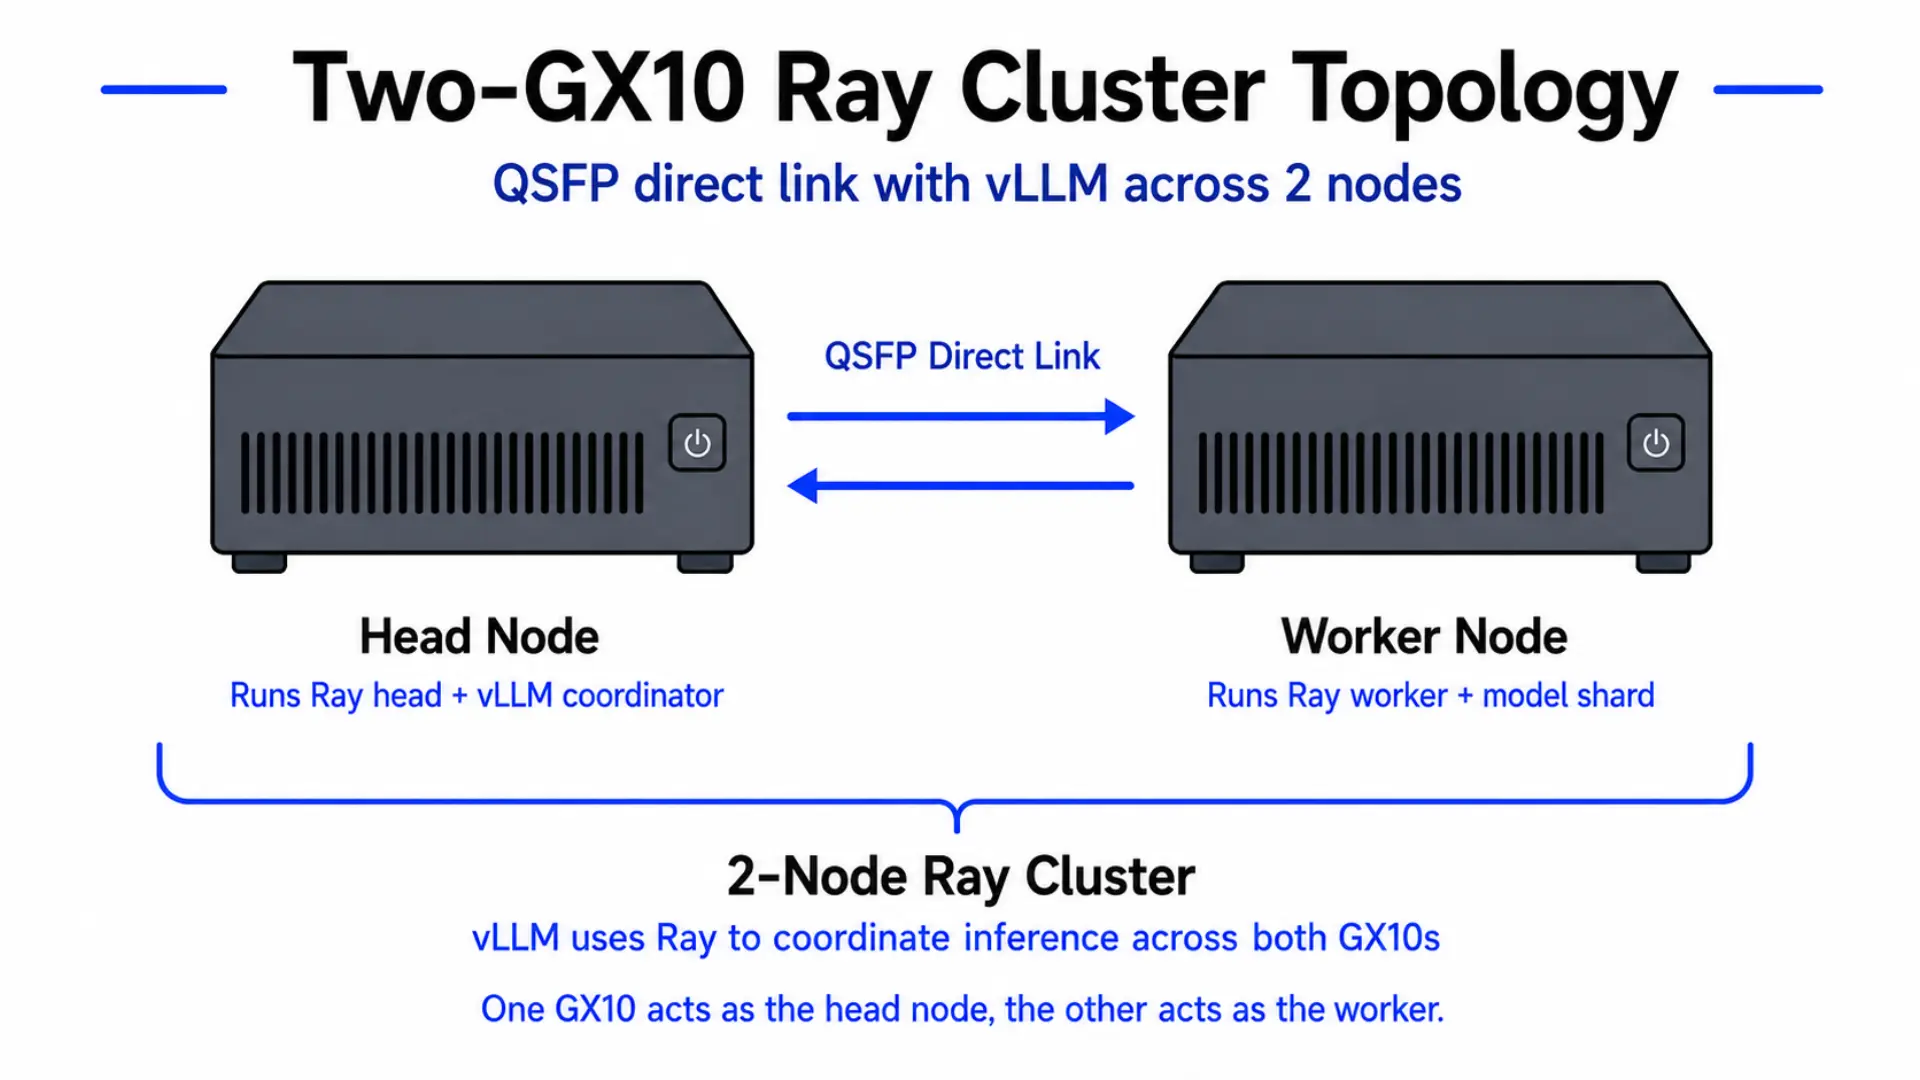 Two-GX10 Ray cluster topology: one machine acts as the head node, the other as the worker, connected over a QSFP direct link. vLLM uses Ray to coordinate inference across both.
The NCCL test worked, but the result was not exactly what I expected.
I saw around 130Gbps. That’s fast, but I had been expecting something closer to 200Gbps. Lower-level RDMA tests showed very low latency, so the ConnectX link itself was clearly working. But GPUDirect RDMA is not supported on the GB10 systems, so this was not the direct GPU-to-NIC path I originally had in mind.
Eventually I had to stop chasing the perfect number. The link worked. The cluster worked. It was enough to move on.
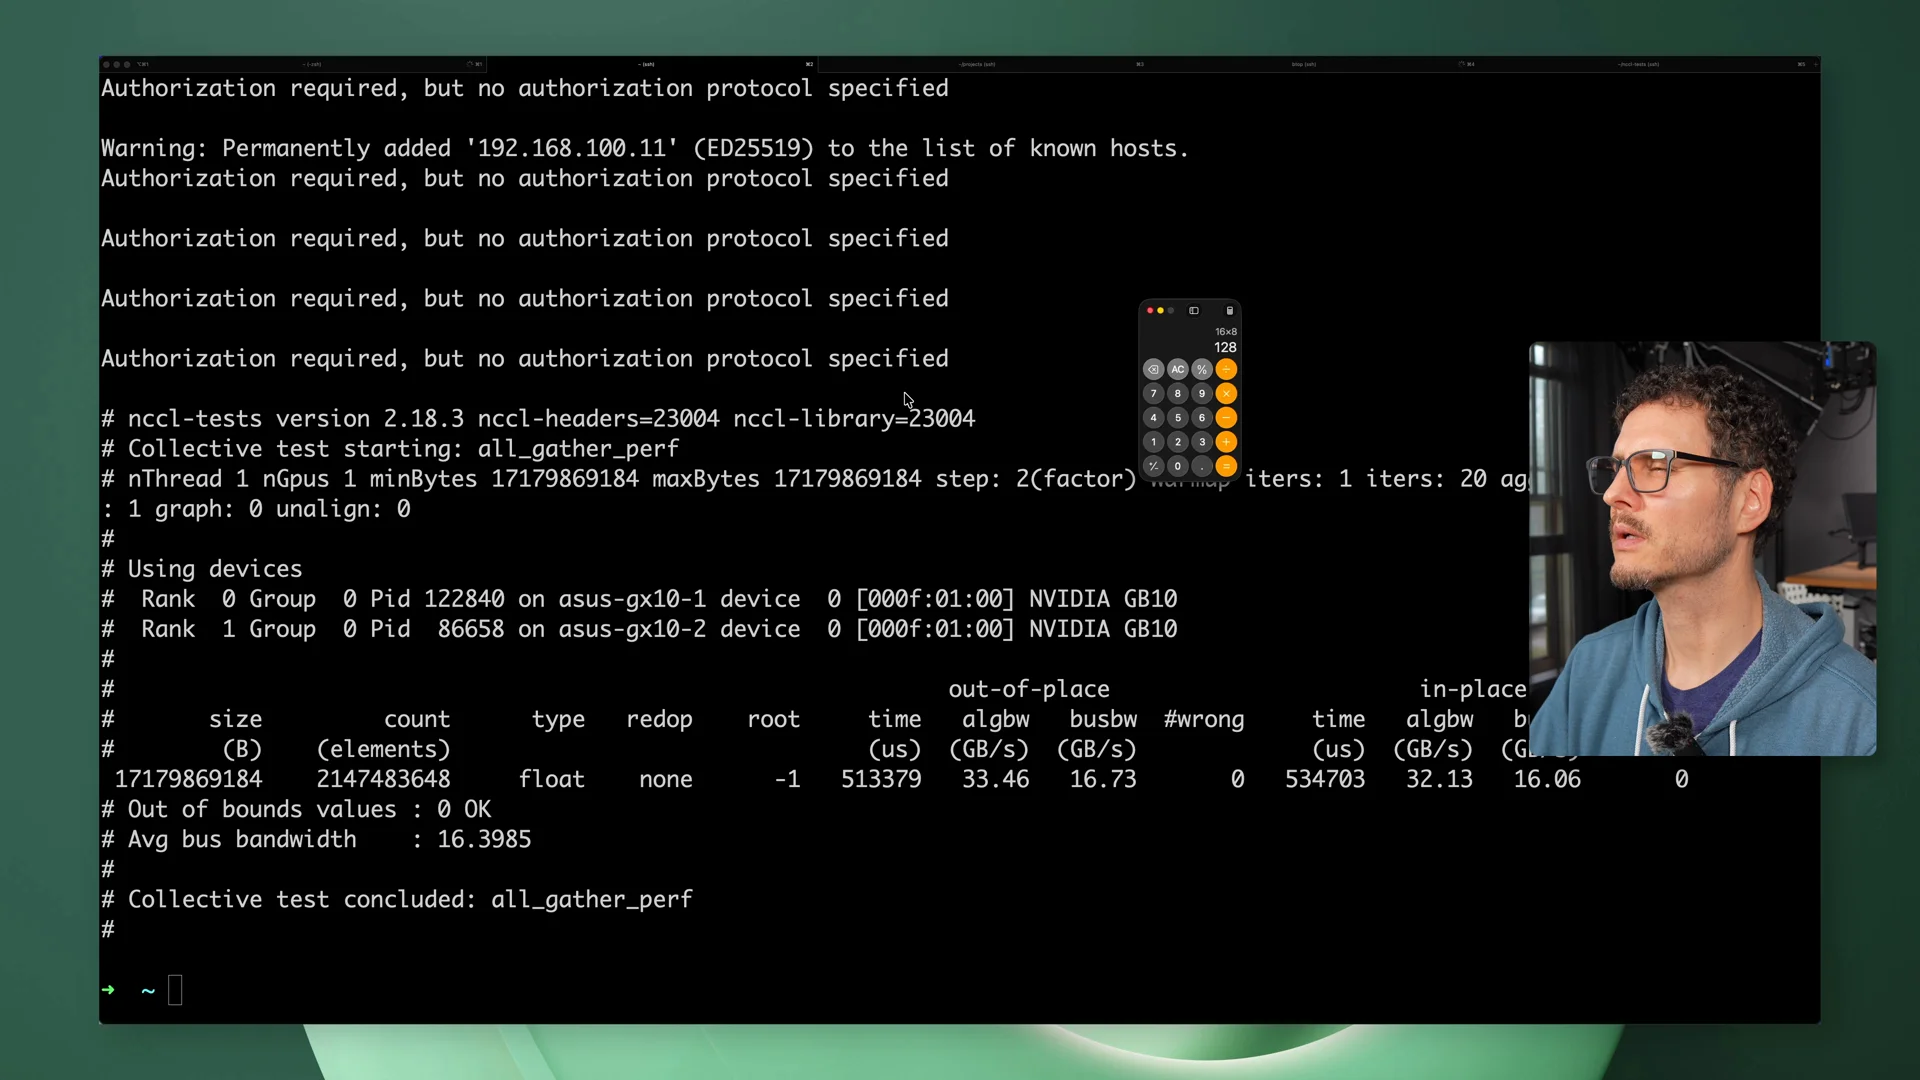 NCCL bandwidth test showing ~130Gbps across the QSFP direct link between the two GX10s.
Before starting, follow the NVIDIA Stacked Sparks guide first. It covers the physical connection, driver setup, and NCCL validation steps that the cluster depends on.
For the full Docker Compose setup I used - including the head and worker configs and the .env file - see the follow-up post: Running the Latest vLLM on the NVIDIA DGX Spark.
The memory problem with bigger models
Finding the right larger model was harder than I expected.
Some newer models were small enough to fit on one GX10. Others were so large that even two GX10s were not enough for the way I wanted to run them.
MiniMax M2.7 looked like the right kind of test because it was aimed at agentic work and software engineering, and it was large enough that two machines actually made sense.
Even then, 256GB across both nodes was cutting it close.
The model would start loading and then crash. That’s where the memory story got more complicated. The model file size is not the whole requirement. You also need room for KV cache, which is the memory the model uses to keep track of context while generating.
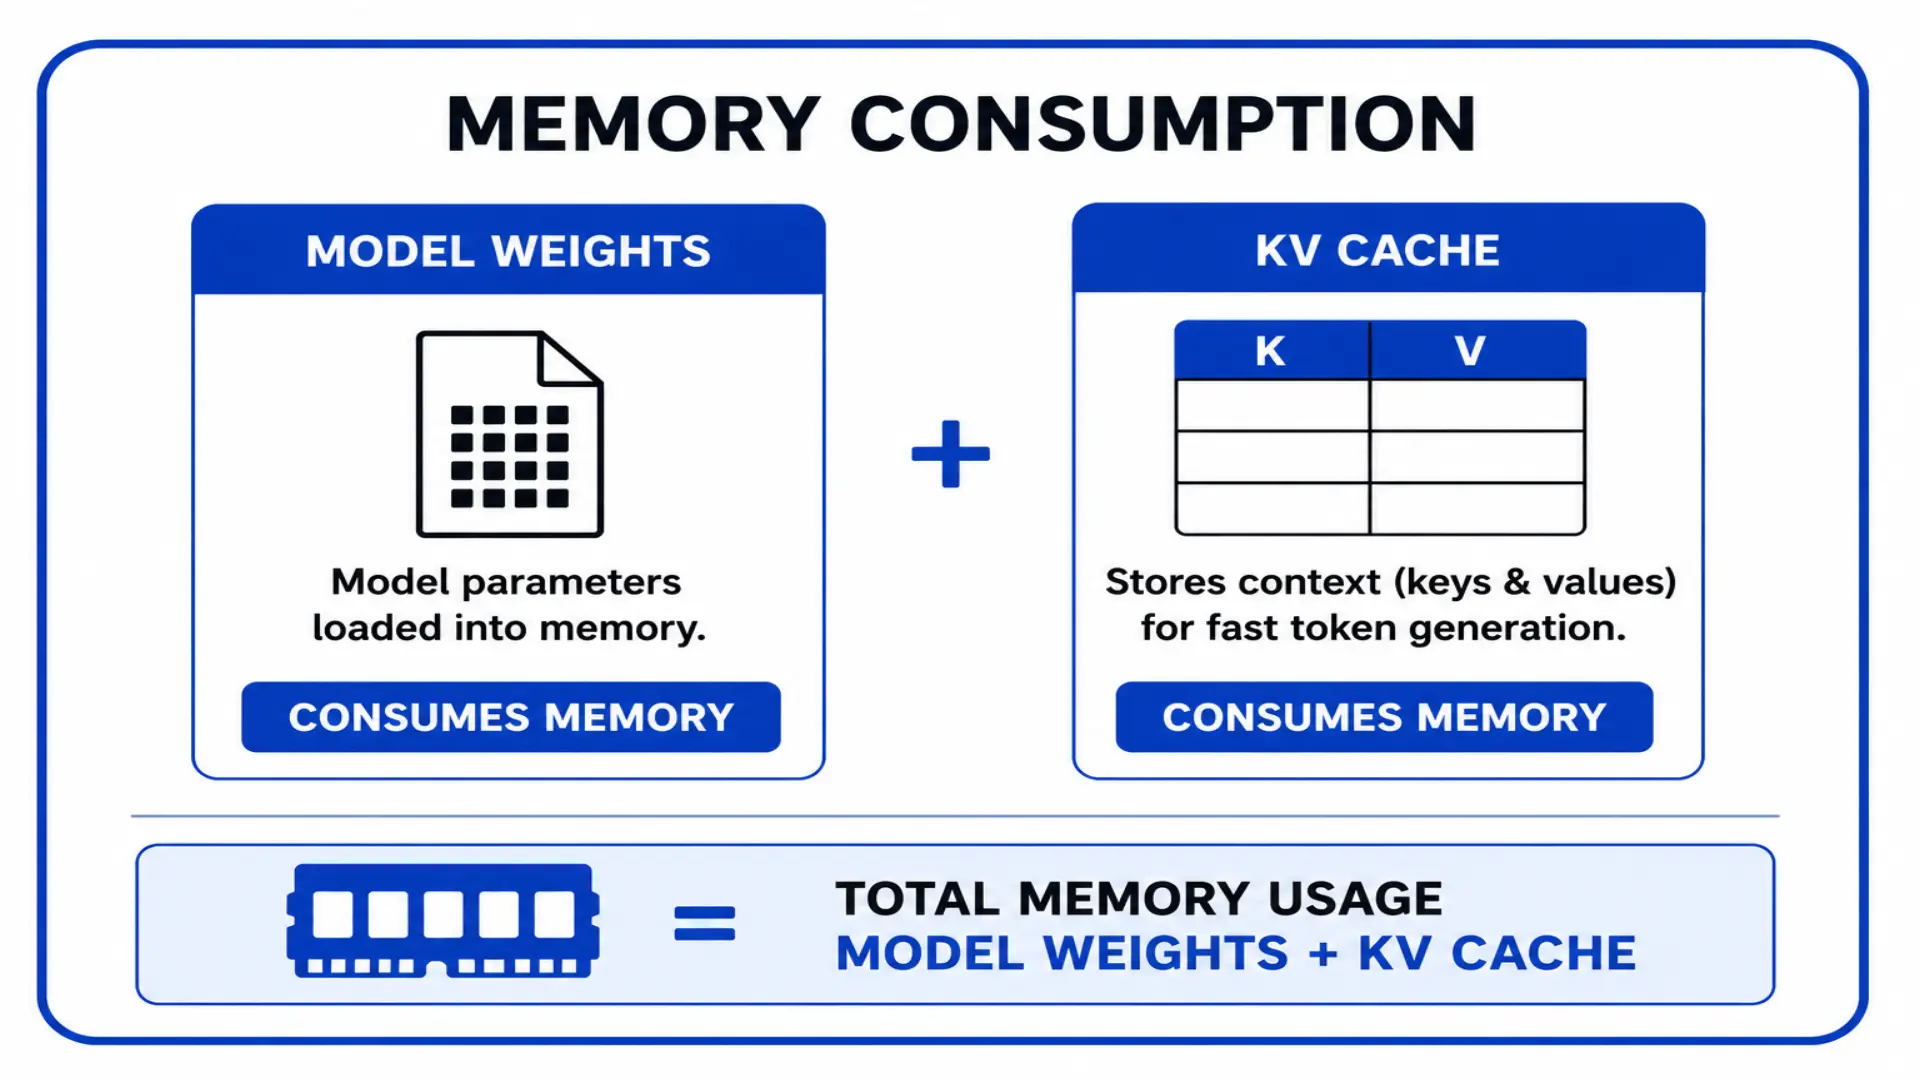 Memory consumption is model weights plus KV cache. The model file size alone does not tell you whether the model will actually fit.
The version that worked was an AWQ 4-bit quantized version of MiniMax M2.7. That got the model loading across both GX10s, but performance still needed tuning.
At one point I was only seeing around 26 to 28 tokens per second. I checked Spark Arena and saw others were getting closer to 38 to 40 tokens per second on the same model, which was almost double what I was seeing. That sent me down a rabbit hole: swapping vLLM versions, compiling libraries, trying different settings. The fix ended up being surprisingly simple: running the vLLM container as privileged.
After that, I got closer to 41 tokens per second, which felt much more in line with what I expected from the two-node cluster.
Test 2: two GX10s
Once the larger model was running across both machines, I ran the same app-building test again.
This run felt better almost immediately.
The agent used create-next-app to scaffold the project. That’s what I’d normally do as a developer. The one-GX10 run felt more like it was building the app manually from memory, starting with files like package.json and building outward.
Starting from the framework’s CLI gave the project a cleaner foundation before the agent started modifying it.
The final app was better too. Filtering worked right away. Edits persisted after refresh. Delete worked. Adding a new service worked.
It was still not perfect, and I still had to pay attention, but the run felt more capable. The model followed the task more cleanly, made better choices, and produced a better result.
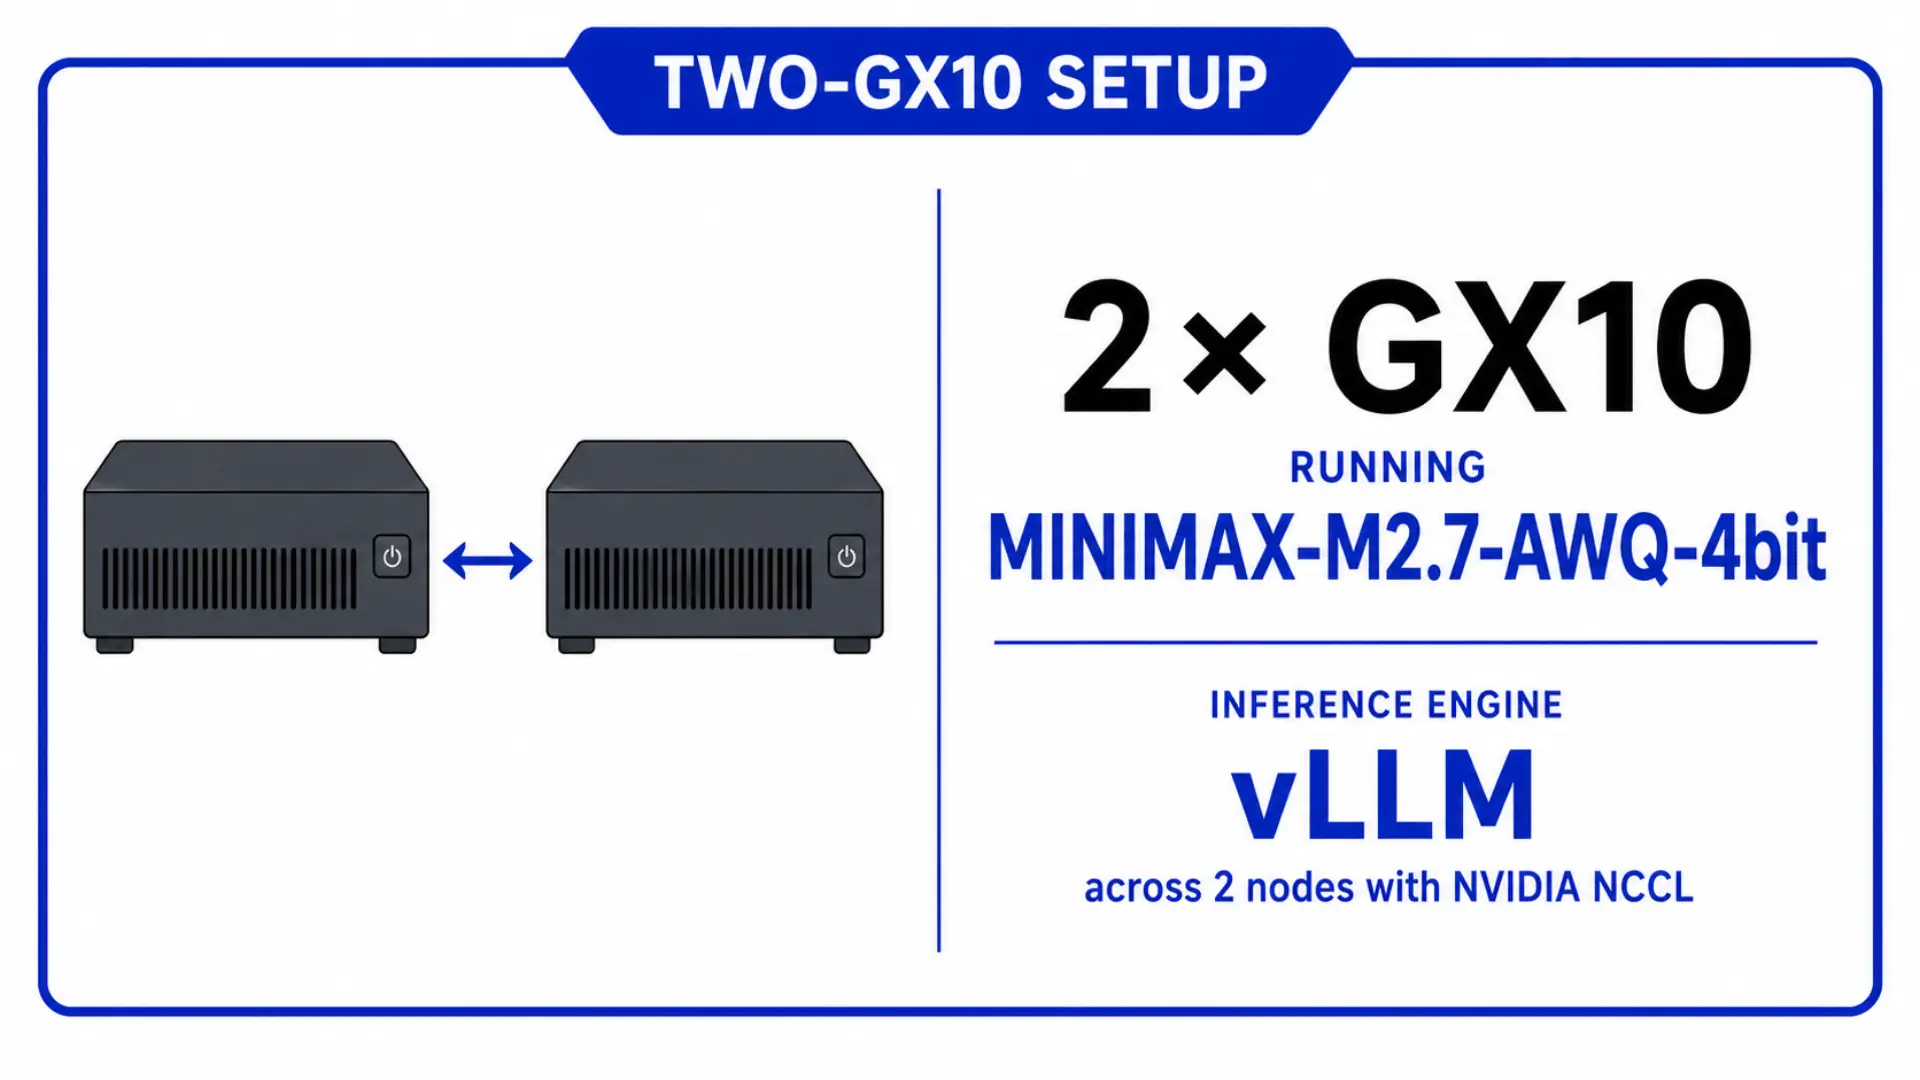 Two-GX10 setup: both machines running MiniMax-M2.7-AWQ-4bit via vLLM across two nodes with NVIDIA NCCL.
 The Homelab Service Tracker working on the first try with the two-GX10 run - filtering, categories, and CRUD all working without the steering the single-GX10 run needed.
Power draw also climbed during the two-node run. While the agent was working, both machines were pulling real power, with the total draw landing in the high-200 to low-300 watt range at points.
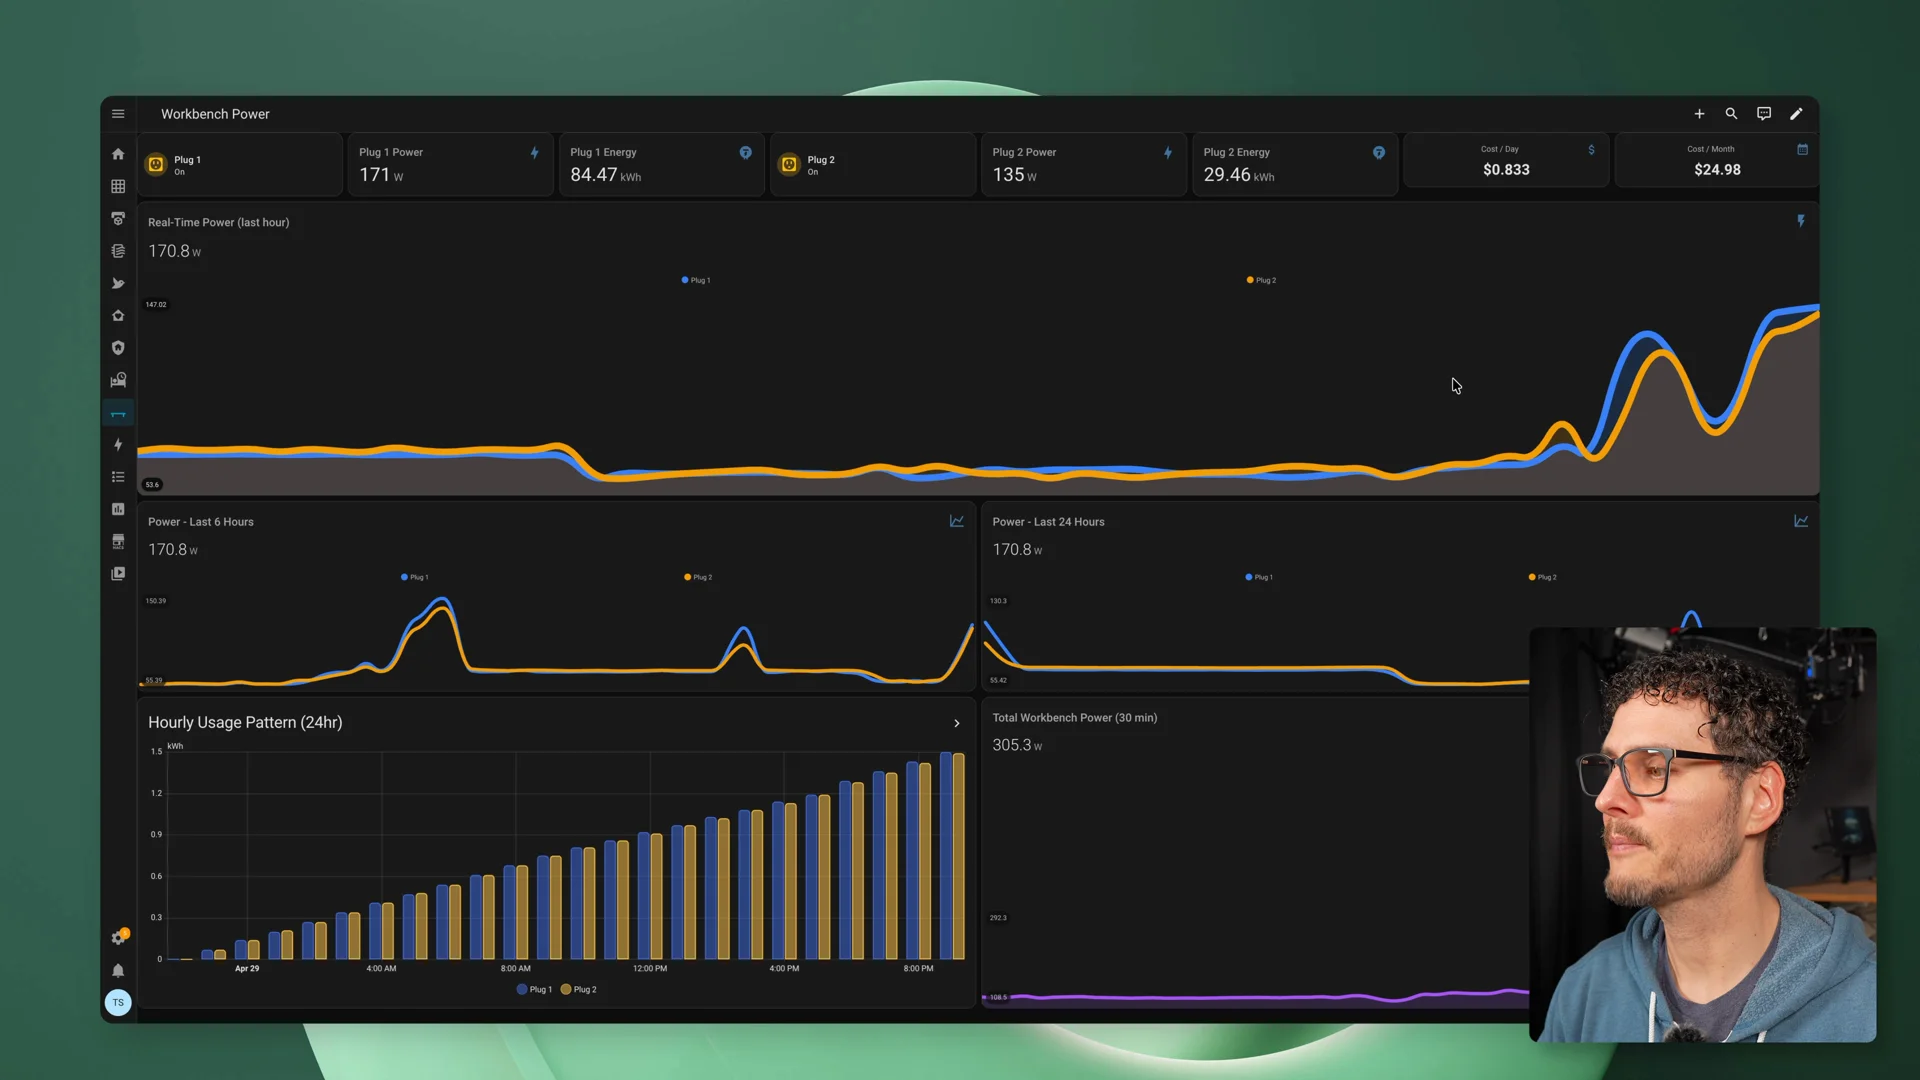 Home Assistant showing power draw across both nodes during the two-node run.
That was the first point where the second machine really felt like it changed the kind of local AI workflow I could run.
One GX10 vs two GX10s
This was not a pure model benchmark.
The hardware changed. The model changed. The available memory changed. The complexity changed.
So I think of it more as a workflow comparison.
One GX10 was the practical version. It proved that local agentic coding is possible on one small box, but it needed steering and patience.
Two GX10s were the bigger-model version. It took more work to get running, used more hardware, used more power, and added more complexity. But once it was running, the workflow felt better.
That does not mean two is automatically worth it for everyone.
It means one GX10 is already useful, and two GX10s make a larger class of local model possible.
The follow-up tests were almost more fun
After the main test, I kept pushing the agent.
The app existed, so the next question was whether the agent could keep improving it.
First I asked it to clean up the UI with DaisyUI. The original app worked, but it looked rough. The agent pulled in DaisyUI, improved the forms and buttons, cleaned up the interface, and made the app feel much more demoable.
 DaisyUI cleanup - the agent pulled in DaisyUI, improved forms and buttons, fixed contrast, and made the app feel much more polished.
Then I gave it a ridiculous prompt: redesign the whole app like a Windows XP desktop.
That was mostly for fun, but it was also a useful stress test. Broad visual changes touch a lot of files, and follow-up fixes show whether the agent can keep working in the same project instead of just producing a one-shot demo.
 Windows XP style redesign - start menu, movable windows, taskbar clock, and system tray. Mostly for fun, but a real stress test of broad visual changes across the whole app.
The result was not perfect, but it was entertaining, and it showed that the workflow could keep going after the first build.
The part I would not gloss over
This isn’t plug and play.
The hardware is capable, and the models are good, but getting all of the pieces working together still takes real effort.
I also ran into one weird behavior while compiling NCCL. The machine did not fully lock up, but it stopped responding over SSH. My sessions disconnected, all CPU cores were pegged at 100%, and once the compile finished, I could SSH back in again.
I reached out to ASUS about it, and they said they could not reproduce it on their end. Since I could reproduce it, I thought it was worth mentioning.
That’s the kind of thing you have to be ready for with a stack like this.
When something breaks, it may be the model, vLLM, Docker, networking, the agent, storage, monitoring, or the app itself. And the fault can live anywhere in that stack.
This is powerful, but it’s still a stack you have to understand.
The cost breakdown
One GX10 is $3,499 MSRP. Two GX10s are roughly $7,000. Add around $100 for the QSFP cable to link them together, and you are looking at about $7,100 to run the two-node setup.
That’s before you think about power.
Running a single GX10 with a model loaded but not actively doing anything sits around 50 watts. Keeping that running all day every day would cost about $4 to $5 a month. When it is actually working, it can push closer to 125 watts.
Two GX10s under load run between 280 and 330 watts total. At that rate all month, you are looking at around $20.
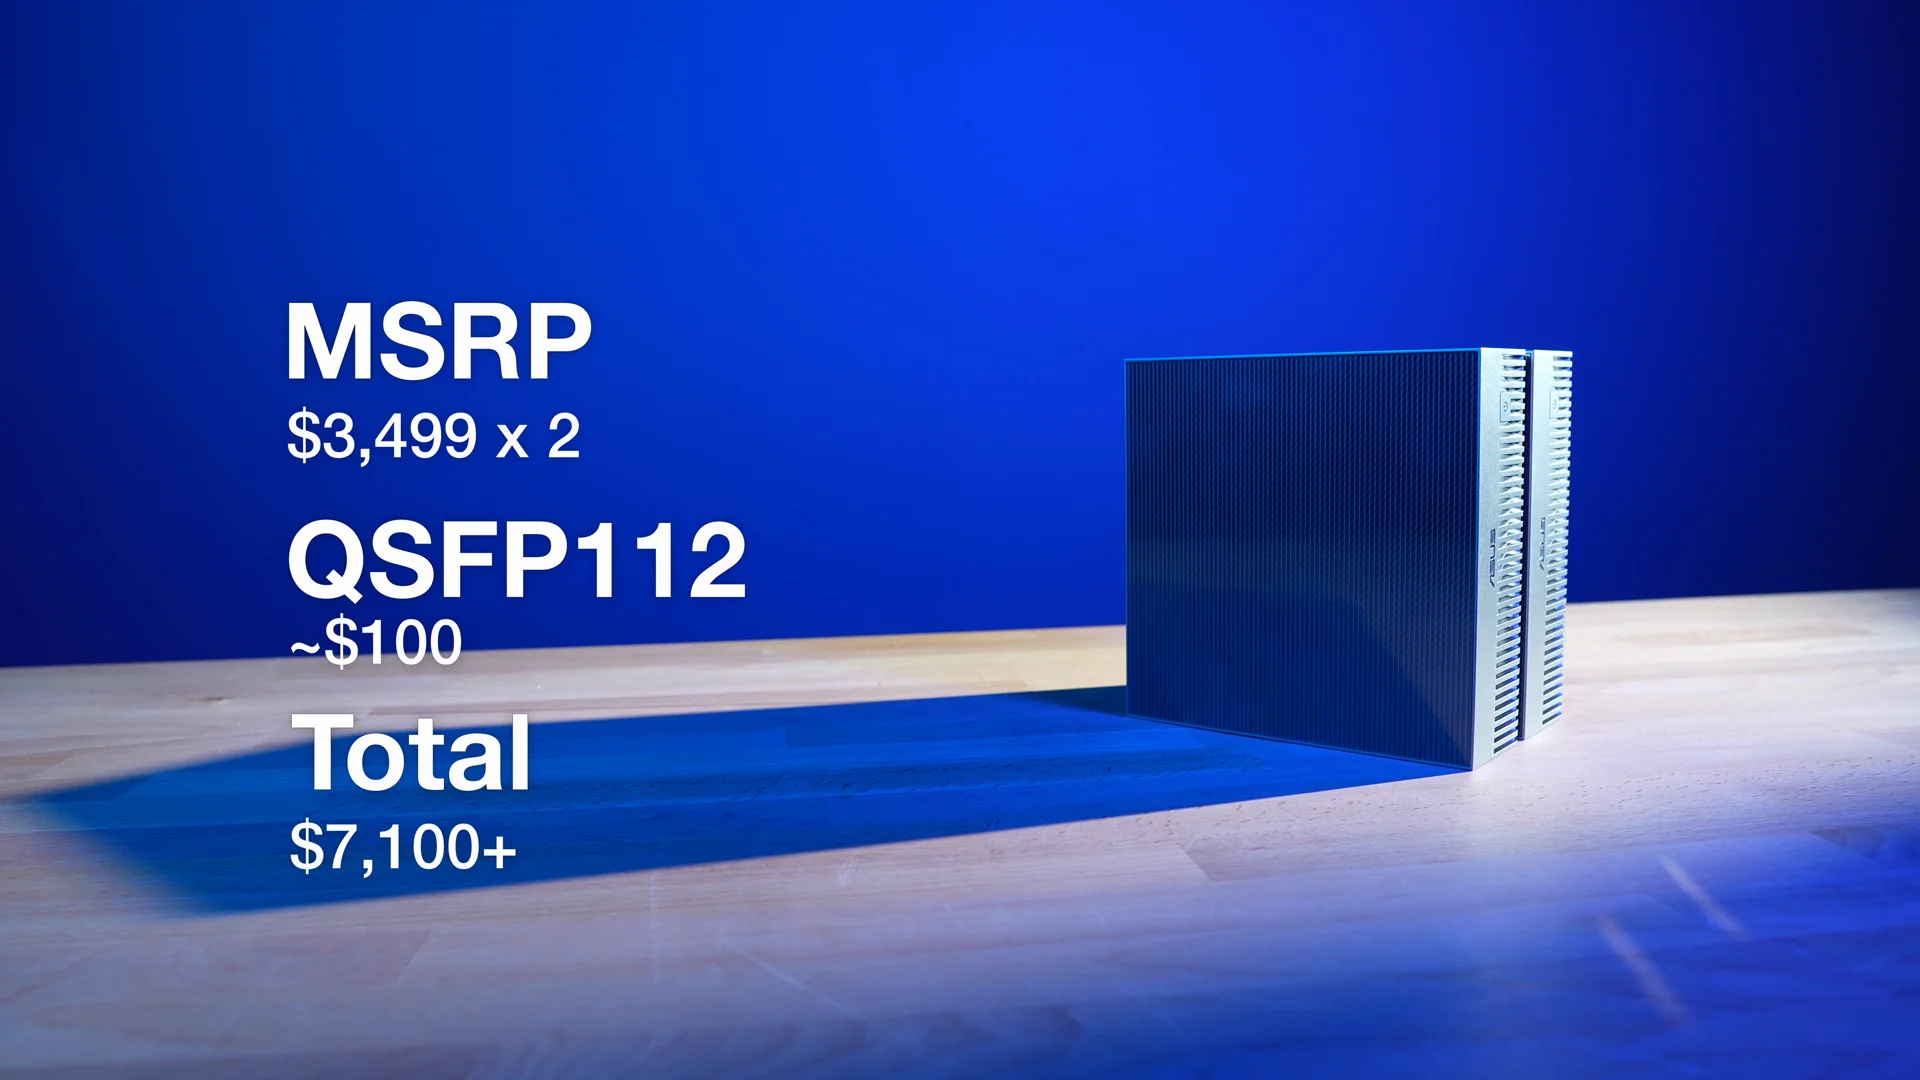 Hardware cost for the two-node cluster: two GX10s plus the QSFP direct-attach cable.
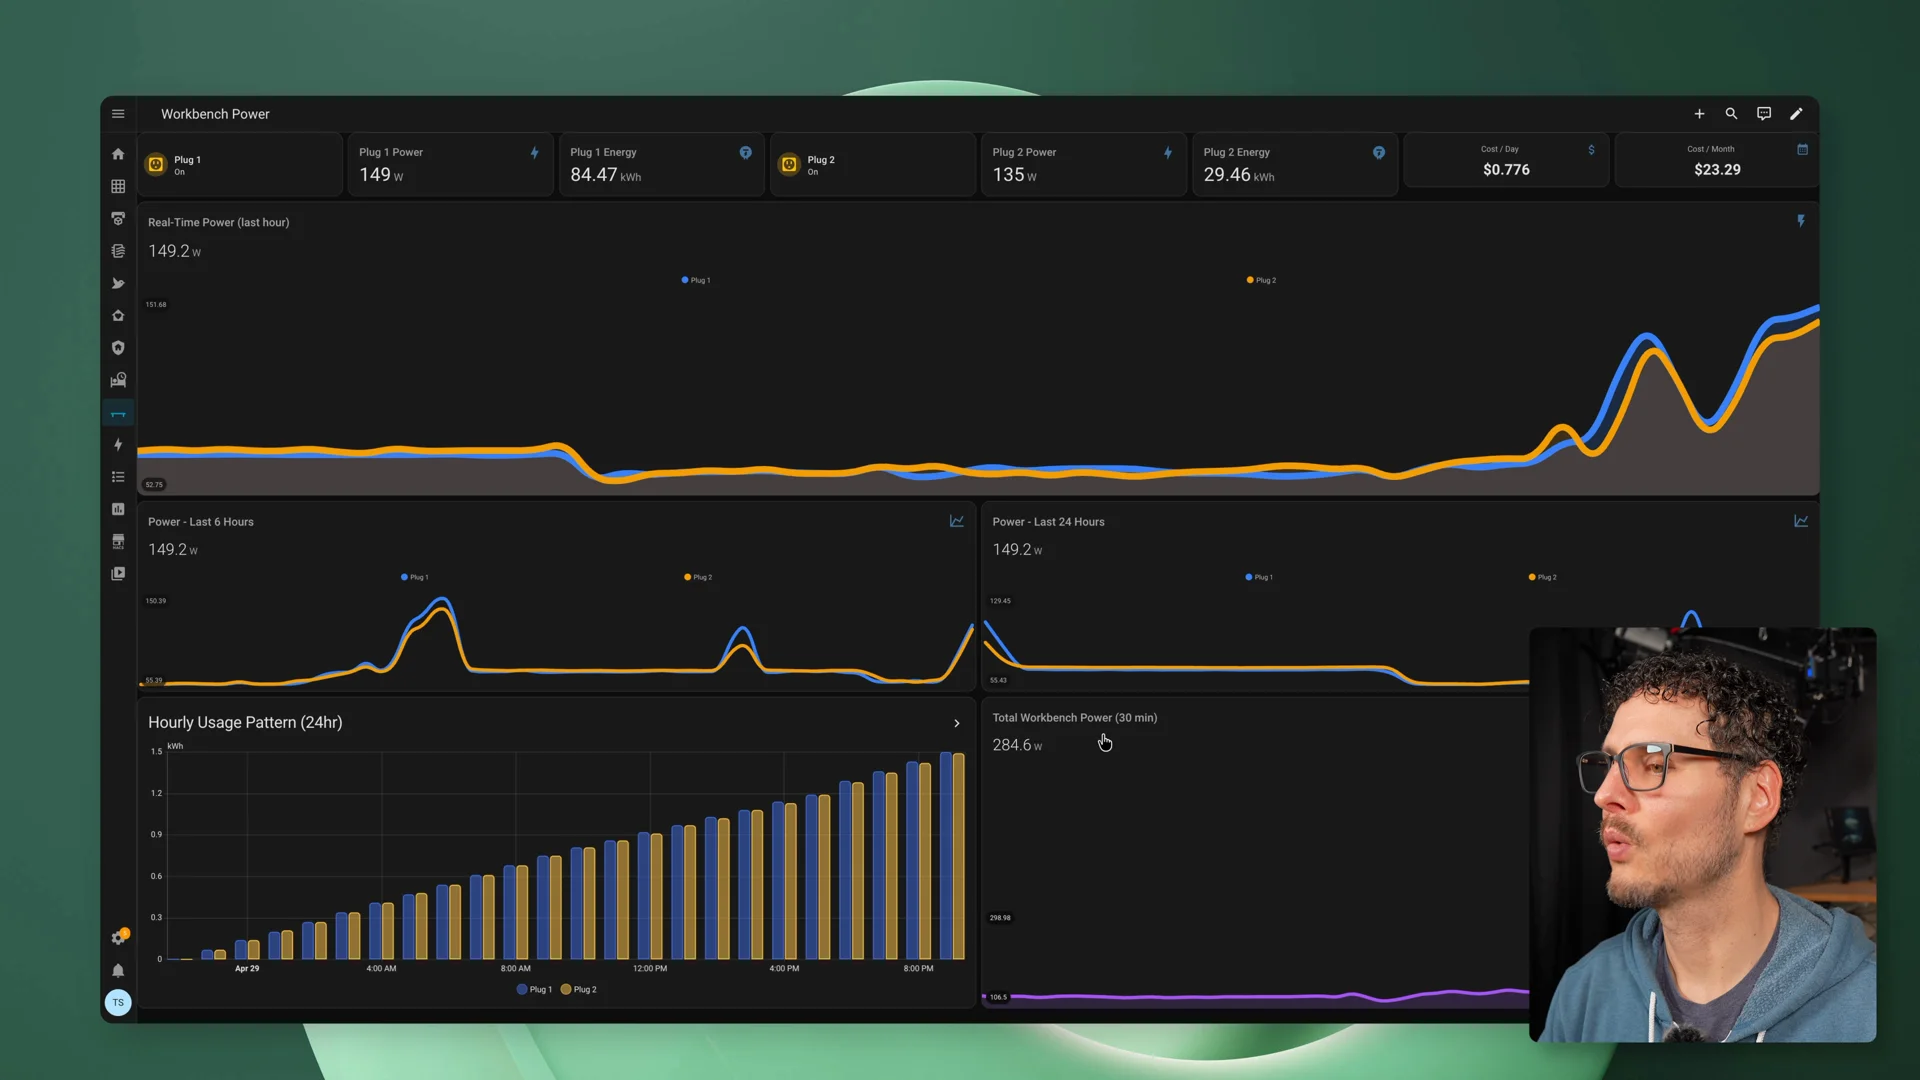 Home Assistant estimated monthly cost with both nodes running - around $20/month at continuous full load.
Who this makes sense for
I would not look at the GX10 as a cheap way to avoid an LLM subscription.
That might be part of the story, but it’s not the whole story.
This makes more sense if you want to learn the NVIDIA stack, run local models, test agent workflows, or build something locally that could eventually move to bigger NVIDIA infrastructure.
If you are comfortable spending time in a terminal, reading logs, changing settings, debugging Docker, tuning vLLM, and dealing with weird issues as they come up, it’s a capable platform that rewards the effort.
If you just want the easiest way to use AI, this probably isn’t it.
For a lot of people, one GX10 is probably the sweet spot. It gives you 128GB of unified memory, a compact local AI machine, good cooling, and enough capability to run useful models and real coding-agent workflows.
Two GX10s make more sense if you specifically want to push into larger models. But two also means double the hardware, more power, more tuning, more complexity, and more things to debug.
 One GX10 versus two: one gave me a practical local coding workflow, two made a much larger class of model possible.
What I learned
The GX10 isn’t the easiest way to run local AI. It’s not the cheapest option either. And it’s not a magic replacement for cloud coding agents.
But it’s one of the most compelling local AI machines I have tested because it makes the whole workflow feel possible on a desk.
That’s the part that stuck with me.
I can imagine pointing a local agent at an old project, letting it work through dependency updates, running tests, trying fixes, and giving me something to review. Not replacing me. Not magically fixing everything. But chipping away at the work I normally avoid.
That workflow actually exists now.
One GX10 made local agentic coding feel practical. Two GX10s made a much larger local model possible.
The real takeaway is that local AI is getting big enough that the hardware matters again.
Where to Buy
(Affiliate links. I may receive a small commission at no cost to you.)
Related
- Clean Ubuntu Server setup for GB10: Ubuntu Server on the NVIDIA DGX Spark
- Ubuntu automation repo: github.com/timothystewart6/ubuntu-gb10
- vLLM image for GB10: Running the Latest vLLM on the NVIDIA DGX Spark
- vLLM image repo: github.com/timothystewart6/vllm-gb10
Join the conversation
I wanted to see how good local AI has actually gotten, so I built a mini AI cluster on my desk and tested it with a real coding workflow.
— Techno Tim (@TechnoTimLive) May 18, 2026
vLLM, OpenCode, NCCL, power monitoring, and open weight models.https://t.co/eMIro0xZwV
🤝 Support the channel and help keep this site ad-free ⚙️ See all the hardware I recommend at https://l.technotim.com/gear