Automatically Install Ubuntu Server With a Bootable USB
I’ve been setting up and rebuilding quite a few machines in my homelab, and one thing I keep doing by hand is installing Ubuntu.
Normally, I boot from a USB drive, choose the disk, create an account, configure SSH, and wait for everything to finish. After that, I can finally connect and let Ansible take over. None of this is particularly difficult, but it gets repetitive when I’m doing the same thing on every rebuild.
I wanted to skip the installer screens entirely. Just plug in a USB drive, boot the machine, and have Ubuntu wipe the system disk, install itself, and set up SSH without me answering any questions.
So I put together a custom Ubuntu 26.04 Server ISO using Autoinstall, GRUB, and xorriso. The installer configuration is right on the USB, so there’s no second drive or network-hosted answer file to manage. I’ve tested it on multiple physical machines, and Ubuntu installs without any questions, reboots into the installed system, and lets me connect over SSH.
This installer automatically erases and repartitions the selected system disk without asking for confirmation. The configuration selects the largest eligible disk by default. Don’t boot it on a machine containing data you need to keep.
What we’re building
This is for 64-bit Intel and AMD machines where I want a fresh Ubuntu Server installation with as little manual setup as possible.
- Ubuntu Server 26.04 on x86_64
- BIOS and UEFI boot support
- No interactive installer questions
- Automatic disk selection and direct partitioning without LVM
- Two accounts,
serveradminandautomation - SSH key authentication with locked passwords
- Passwordless sudo for both accounts
- OpenSSH Server without an additional application stack
The machine still has to boot from USB, either through the firmware boot order or a one-time boot menu. From there, the installer is configured to run without prompts. I left networking on Ubuntu’s default DHCP behavior so I don’t have to hardcode physical network interface names.
Download Ubuntu Server
I built this on macOS using the original Ubuntu 26.04 live-server ISO. I’m sticking with that version here because the GRUB patch below matches the files in that image. For the build, I’m using xorriso and 7-Zip, both installed through Homebrew.
1
brew install xorriso sevenzip
If you’re building the ISO on Ubuntu instead, install the tools with apt. I included ruby for the YAML check and curl for downloading the ISO. The 7zip-standalone package provides the 7zz command used later in the post.
1
2
sudo apt update
sudo apt install -y xorriso 7zip-standalone ruby curl
The GRUB editing and USB writing commands later in the post are macOS-specific, so those parts need different commands on Ubuntu.
I keep the ISO and build files in their own directory. Create one and download Ubuntu’s ISO and checksum file there.
1
2
3
4
5
6
7
8
mkdir -p ~/ubuntu-autoinstall
cd ~/ubuntu-autoinstall

curl -fLO \
  https://releases.ubuntu.com/26.04/ubuntu-26.04-live-server-amd64.iso

curl -fLO \
  https://releases.ubuntu.com/26.04/SHA256SUMS
Before modifying the image, check its checksum against Ubuntu’s published file. If the download is incomplete or corrupted, I’d rather catch it now than troubleshoot it as a boot problem.
1
2
grep 'ubuntu-26.04-live-server-amd64.iso' SHA256SUMS \
  | shasum -a 256 -c -
The check should print OK. I’m using the original ISO as the base and changing only the files the unattended installer needs.
Create the autoinstall configuration
Ubuntu’s Autoinstall reads a YAML file instead of asking you to fill out the usual installer screens. I can set the disk layout, accounts, SSH, and packages ahead of time.
I use two accounts on these machines. serveradmin is for my normal admin access, and automation is the account Ansible uses after Ubuntu is installed. Both sign in with SSH keys, not passwords.
Get the SSH public keys
I’m using two SSH public keys I already have. Change the paths if your key files have different names. Only the public keys go into the installer, and the private keys stay on the machine I connect from.
1
2
SERVERADMIN_KEY=$(cat "$HOME/.ssh/id_ed25519.pub")
AUTOMATION_KEY=$(cat "$HOME/.ssh/automation_ed25519.pub")
Create autoinstall.yaml
This follows the configuration I used, but reads your public keys from local files instead of including mine in the post.
1
2
3
4
5
6
7
8
9
10
11
12
13
14
15
16
17
18
19
20
21
22
23
24
25
26
27
28
29
30
31
32
33
34
35
36
37
38
39
40
41
42
43
44
45
46
47
48
49
50
cat > autoinstall.yaml <<EOF_YAML
#cloud-config
autoinstall:
  version: 1
  interactive-sections: []
  locale: en_US.UTF-8
  keyboard:
    layout: us
  refresh-installer:
    update: false
  storage:
    layout:
      name: direct
  ssh:
    install-server: true
    allow-pw: false
    authorized-keys:
      - $SERVERADMIN_KEY
      - $AUTOMATION_KEY
  user-data:
    hostname: ubuntu-baremetal
    manage_etc_hosts: true
    timezone: UTC
    ssh_pwauth: false
    disable_root: true
    users:
      - name: serveradmin
        gecos: Server administrator
        primary_group: serveradmin
        groups: [adm, sudo]
        shell: /bin/bash
        lock_passwd: true
        sudo: "ALL=(ALL) NOPASSWD:ALL"
        ssh_authorized_keys:
          - $SERVERADMIN_KEY
      - name: automation
        gecos: Ansible automation account
        primary_group: automation
        groups: [adm, sudo]
        shell: /bin/bash
        lock_passwd: true
        sudo: "ALL=(ALL) NOPASSWD:ALL"
        ssh_authorized_keys:
          - $AUTOMATION_KEY
    packages:
      - openssh-server
    runcmd:
      - [sshd, -t]
      - [systemctl, reload, ssh]
EOF_YAML
I used the direct layout because I don’t need LVM for these installs. Ubuntu creates regular partitions and, unless you specify a disk match, selects the largest eligible disk. That’s fine for a machine with one system disk, but I’d match by serial number or another attribute if there are multiple drives.
With interactive-sections: [], the installer has no interactive sections. GRUB also needs the autoinstall boot parameter so Ubuntu doesn’t stop to confirm that it’s about to overwrite the disk.
The user-data section uses cloud-init to create both accounts. Their passwords are locked, they have NOPASSWD sudo, and the top-level ssh settings disable password authentication. I’m also using disable_root: true, although that isn’t the same as explicitly setting PermitRootLogin no in sshd_config.
OpenSSH Server is the only additional package I’m asking for on top of Ubuntu’s normal server installation. The runcmd entries test the SSH configuration and reload the service when cloud-init runs on first boot.
Since both passwords are locked, I can’t fall back to a password login at the console if SSH or networking doesn’t come up. I’m comfortable with that on machines I’m intentionally rebuilding, but it’s worth knowing before using this configuration elsewhere.
Check the YAML before building
Before rebuilding the ISO, I run a quick Ruby check for the disk layout, account names, and package list. These are the settings I especially don’t want to get wrong.
1
2
3
4
5
6
7
8
ruby -ryaml -e '
d = YAML.load_file(ARGV[0])
a = d["autoinstall"]
raise "not direct" unless a.dig("storage", "layout", "name") == "direct"
raise "bad accounts" unless a.dig("user-data", "users").map { |u| u["name"] }.sort == ["automation", "serveradmin"]
raise "extra packages" unless a.dig("user-data", "packages") == ["openssh-server"]
puts "YAML OK"
' autoinstall.yaml
This catches YAML errors and checks those values, but it isn’t a full Autoinstall schema check. Canonical has a separate Subiquity validator for that.
Make GRUB start the installer automatically
Ubuntu’s live-server ISO uses GRUB to boot the installer. I’m modifying its kernel command line so Subiquity reads the YAML file from the USB instead of asking for configuration during the install.
I start by extracting grub.cfg from the Ubuntu ISO. That way I’m modifying its actual boot entry instead of trying to recreate it from memory.
1
2
3
4
5
6
build_dir=$(mktemp -d ./ubuntu-baremetal-build.XXXXXX)

xorriso \
  -osirrox on \
  -indev ubuntu-26.04-live-server-amd64.iso \
  -extract /boot/grub/grub.cfg "$build_dir/grub.cfg"
The kernel command line needs autoinstall to run unattended, along with subiquity.autoinstallpath pointing to the embedded file.
1
autoinstall subiquity.autoinstallpath=/cdrom/autoinstall.yaml
I used sed to insert these into the original kernel line while leaving the rest of GRUB’s configuration alone.
1
2
3
sed -i '' \
  's|linux  /casper/vmlinuz  ---|linux  /casper/vmlinuz autoinstall subiquity.autoinstallpath=/cdrom/autoinstall.yaml ---|' \
  "$build_dir/grub.cfg"
This sed expression matches the original Ubuntu 26.04 boot line, including its spacing. If you’re using a different ISO, check its GRUB file before assuming the same replacement will work.
1
2
3
grep -nF \
  'autoinstall subiquity.autoinstallpath=/cdrom/autoinstall.yaml' \
  "$build_dir/grub.cfg"
If grep doesn’t find the new parameters, stop here and check the boot line. I left GRUB’s timeout and default menu entry alone. Once I selected the USB as the boot device on the physical machines I tested, the installer started without another menu selection.
Rebuild the ISO without breaking BIOS or UEFI booting
This part took me longer than I expected. The first custom ISO looked fine when I opened it. It had the Ubuntu kernel, GRUB, an EFI bootloader, and an MBR, and it passed the archive integrity test.
But the USB wouldn’t boot correctly. When I checked the ISO’s boot information with xorriso, I got this.
1
No El Torito information was loaded
I went back and compared it with Ubuntu’s original ISO. The original had an El Torito boot catalog, BIOS and UEFI entries, and hybrid disk metadata for USB booting. My rebuilt ISO still had the boot files, but it was missing the entries firmware needs to find them.
Rather than guessing at every boot option, I went back to the original ISO and used xorriso to replay its boot configuration while replacing just the files I needed.
1
2
3
4
5
6
7
8
9
10
11
12
13
cfg='autoinstall.yaml'
template='ubuntu-26.04-live-server-amd64.iso'
out='ubuntu-x86_64-baremetal-autoinstall.iso'

xorriso \
  -indev "$template" \
  -outdev "$out" \
  -map "$build_dir/grub.cfg" /boot/grub/grub.cfg \
  -map "$cfg" /autoinstall.yaml \
  -boot_image any replay \
  -volid 'Ubuntu x86_64 autoinstall' \
  -commit \
  -end
The two -map options replace GRUB’s configuration and add /autoinstall.yaml. With -boot_image any replay, xorriso rebuilds the boot information it recognized in the original ISO, including the BIOS and UEFI entries. That saved me from having to reconstruct the boot catalog manually.
I also included NoCloud files under /answers/ in my original build, with copies of user-data, meta-data, network-config, and a README. They’re useful to inspect or reuse, but the installer reads /autoinstall.yaml directly. I left those extra files out of the example because they’re not needed to boot this installer.
The build log confirmed that xorriso replayed the original boot settings.
1
2
3
xorriso : NOTE : Replayed 21 boot related commands
ISO image produced: 1424598 sectors
Writing completed successfully.
Verify the custom ISO
Before writing anything to USB, I check the boot catalog. This is where the first ISO was missing its boot entries.
1
2
3
xorriso \
  -indev "$out" \
  -report_el_torito plain
The output should list BIOS and UEFI boot entries. If you see the earlier No El Torito information was loaded message, the ISO still has the same problem.
I also check the system-area metadata, since this ISO needs to boot from a USB drive and not just be a readable archive.
1
2
3
xorriso \
  -indev "$out" \
  -report_system_area plain
I also extract the embedded YAML and compare it with the file I started with. I don’t want the ISO to contain a stale copy of the configuration.
1
2
3
4
5
6
xorriso \
  -osirrox on \
  -indev "$out" \
  -extract /autoinstall.yaml "$build_dir/embedded.yaml"

cmp "$cfg" "$build_dir/embedded.yaml"
cmp prints nothing if the two files match. I also run an archive test and record the ISO’s checksum.
1
2
3
7zz t "$out"
file "$out"
shasum -a 256 "$out"
The fixed custom build passed these checks, including the boot entries for both firmware types. That confirmed the boot catalog missing from my first attempt was back in the ISO.
1
2
3
4
5
6
$ xorriso -indev ubuntu-x86_64-baremetal-autoinstall.iso -report_el_torito plain
Boot record  : El Torito , MBR protective-msdos-label grub2-mbr cyl-align-off GPT
El Torito catalog  : 491  1
El Torito boot img :   1  BIOS  y   none  0x0000  0x00      4         492
El Torito boot img :   2  UEFI  y   none  0x0000  0x00  10296     1422056
El Torito img path :   1  /boot/grub/i386-pc/eltorito.img
Write the ISO to USB on macOS
I used a 64 GB USB 3.0 drive. The ISO was only about 2.9 GB, so most of the drive’s capacity was unused after writing the raw image. That’s expected. I used diskutil to find the correct device before writing anything to it.
1
diskutil list external physical
Make sure the disk number and capacity match the USB you intend to overwrite. The write command below replaces its partition table and everything else on that device.
Double-check the disk identifier before running
dd. In this example,diskNandrdiskNare placeholders. Replace both with the same actual device number reported bydiskutil.
1
2
3
ISO="$PWD/ubuntu-x86_64-baremetal-autoinstall.iso"
USB_DISK=/dev/diskN
USB_RAW_DISK=/dev/rdiskN
The following command unmounts the USB, writes the ISO, compares the written bytes, and ejects it. If one of those steps fails, the commands after it won’t run.
1
2
3
4
5
6
7
8
9
10
11
diskutil unmountDisk "$USB_DISK" && \
sudo dd \
  if="$ISO" \
  of="$USB_RAW_DISK" \
  bs=4m && \
sync && \
sudo cmp \
  -n "$(stat -f%z "$ISO")" \
  "$ISO" \
  "$USB_RAW_DISK" && \
diskutil eject "$USB_DISK"
On macOS, I’m writing to the raw device (rdiskN). Once dd finishes, cmp checks the written bytes against the ISO before the drive gets ejected.
Boot the machine
Choose the USB in the machine’s boot menu or set it first in the firmware boot order. On the machines I tested, GRUB loaded Ubuntu with the autoinstall arguments, and the installation finished without any questions. Ubuntu then rebooted into the installed system.
I also checked the UEFI boot order on my MS-03 with the installer USB still plugged in. The USB showed up as /dev/sda, while Ubuntu was running from /dev/nvme0n1p2 with its EFI partition on /dev/nvme0n1p1. Both BootCurrent and BootOrder were 0000, pointing to the Ubuntu bootloader on the internal NVMe drive. There was no separate USB boot entry.
I didn’t force another reboot during that check, but the firmware’s current boot order prefers the installed Ubuntu system. I’d still verify that on other hardware before leaving a USB that can erase the system disk plugged in.
Check the installed system
After Ubuntu booted from the internal disk, I connected using the SSH key from the installer configuration. You can do the same with the key and username you used in your YAML.
1
2
ssh -i ~/.ssh/id_ed25519 \
  serveradmin@<server-ip>
Use your own private key and the IP address from DHCP. After connecting, check cloud-init and the disk layout.
1
2
3
cloud-init status --wait
lsblk -o NAME,SIZE,FSTYPE,TYPE,MOUNTPOINTS
findmnt /
The root filesystem should be on a normal partition rather than an LVM logical volume. I also check the effective SSH settings instead of relying only on what I put in the YAML.
1
2
sudo sshd -T | grep -E \
  '^(passwordauthentication|permitrootlogin|kbdinteractiveauthentication) '
Password authentication should be disabled. The root login setting is worth checking separately because disable_root: true doesn’t necessarily set PermitRootLogin no in the SSH daemon. I also check that sudo works without a password.
1
sudo -n true
I ran the same SSH and sudo checks using the automation account and its key. Both accounts worked, so Ansible has the access it needs to take over from there.
The image below is a stylized rendering of the MS-03 post-install checks, not a screenshot from the actual SSH session.
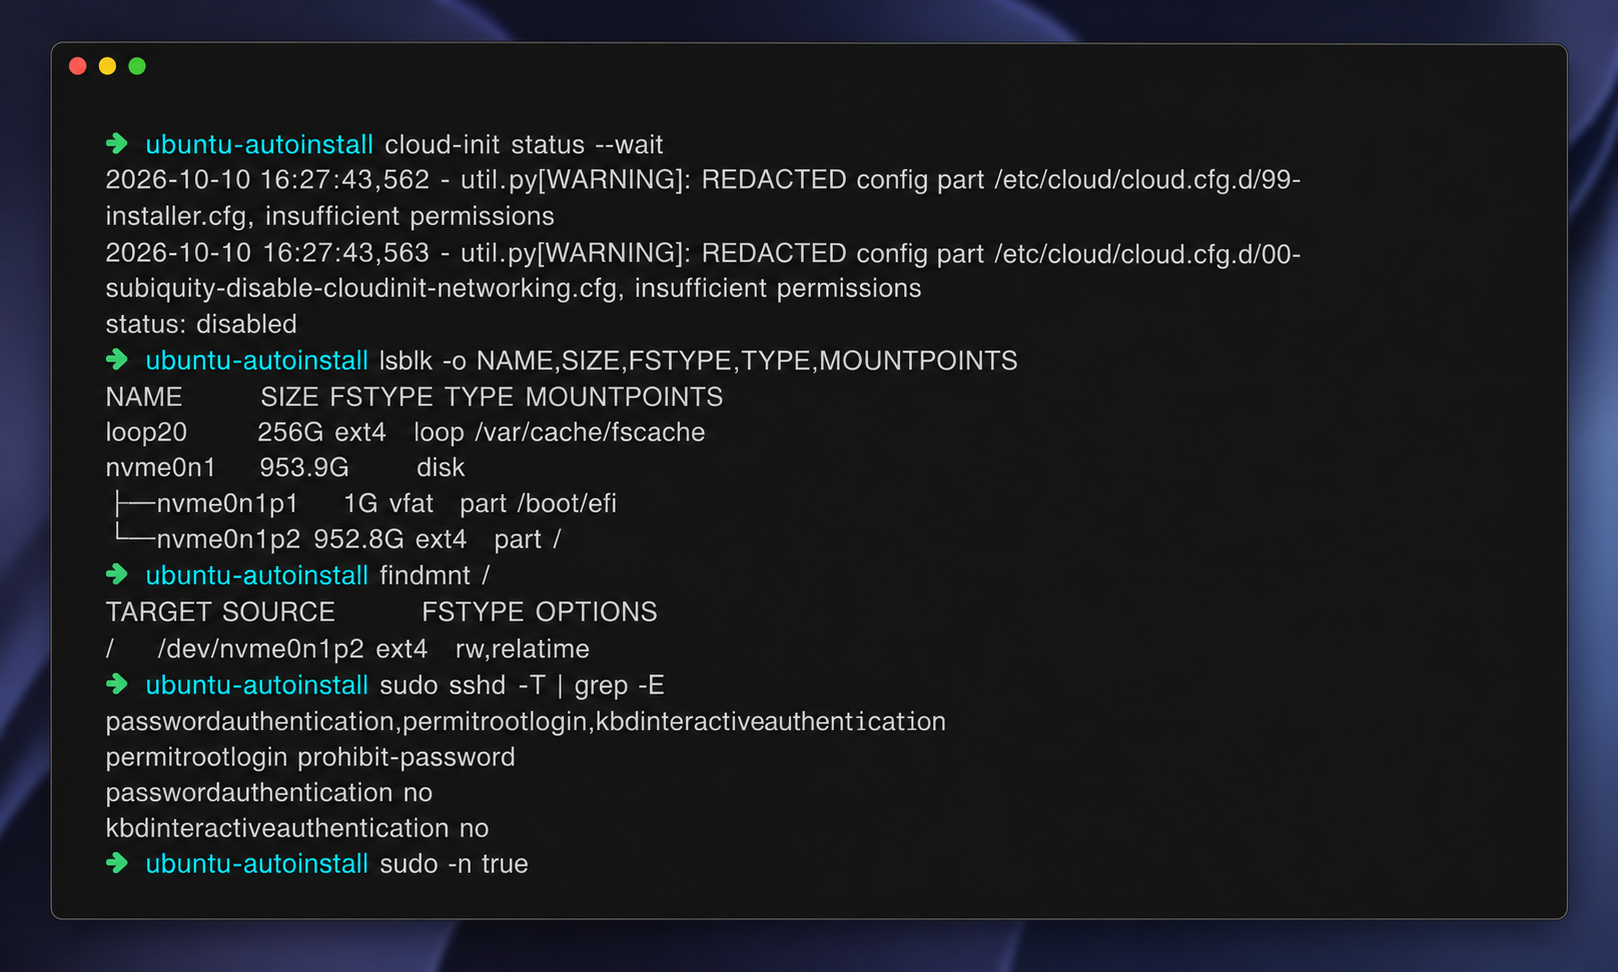 Stylized rendering of the MS-03 post-install verification checks
cloud-init status --waitreporteddisabledon this installed system, along with warnings about reading root-owned installer configuration files from an unprivileged account. The partition layout, SSH settings, and passwordless sudo checks all worked, so I’m keeping those checks separate from the cloud-init status output.
Final thoughts
I started this because I was tired of answering the same installer questions every time I rebuilt a machine. The YAML wasn’t too difficult, but the first custom ISO wouldn’t boot because I’d lost Ubuntu’s boot metadata during the rebuild. Preserving those original boot settings was the part I needed to figure out.
The USB has been through unattended installs on physical machines, and both SSH accounts work afterward. Now I can boot a machine from USB, let Ubuntu handle the installation, and hand the rest of the configuration over to Ansible. That’s pretty much what I wanted in the first place.